
I2C (Inter-Integrated Circuit) is a widely used communication protocol that allows microcontrollers to interface with various peripheral devices using just two wires. In this guide, we demonstrate how to perform I2C read operations in MicroPython using an STM32F411 microcontroller.
In this guide, we shall cover the following:
- What is I2C bus.
- Firmware Development.
- Connection.
- Results.
1. What is I2C Bus:
With I2C, data is transferred in messages. Messages are broken up into frames of data. Each message has an address frame that contains the binary address of the slave, and one or more data frames that contain the data being transmitted. The message also includes start and stop conditions, read/write bits, and ACK/NACK bits between each data frame:
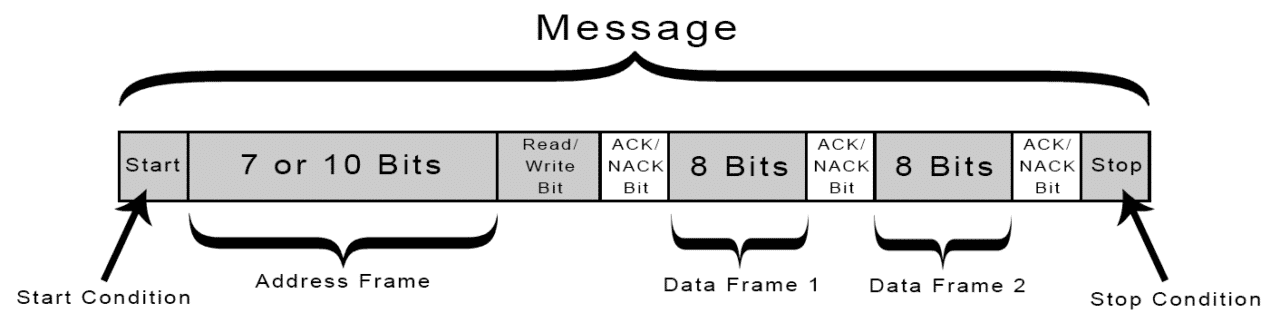
Start Condition: The SDA line switches from a high voltage level to a low voltage level before the SCL line switches from high to low.
Stop Condition: The SDA line switches from a low voltage level to a high voltage level after the SCL line switches from low to high.
Address Frame: A 7 or 10 bit sequence unique to each slave that identifies the slave when the master wants to talk to it.
Read/Write Bit: A single bit specifying whether the master is sending data to the slave (low voltage level) or requesting data from it (high voltage level).
ACK/NACK Bit: Each frame in a message is followed by an acknowledge/no-acknowledge bit. If an address frame or data frame was successfully received, an ACK bit is returned to the sender from the receiving device.
For more information and detailed explanations refer to this NXP documentation (here).
2. Firmware Development:
Before we start the firmware development, we need to install and configure thonny. For more details, please refer to this guide here.
After the configuration, we can develop the firmware.
We start by importing from machine the following:
from machine import I2C, Pin
This will allow us to use I2C functions.
Also, import time for delay purposes:
import time
Next, initialize i2c bus as following:
i2c = I2C(1,freq=100_000)
The function takes two arguments:
- I2C bus number which is 1 in this case.
- Frequency of the clock data, which is 100KHz (Can be 400K or 1MHz).
Since this guide uses DS3231 RTC as slave device, we shall declare the address as following:
DS3231_ADDR = 0x68 # I2C address for DS3231
Next, a function to read the time from DS3231:
def read_time():
    # Read from register 0x00 to 0x02: seconds, minutes, hours
    data = i2c.readfrom_mem(DS3231_ADDR, 0x00, 3)

    seconds = bcd2dec(data[0])
    minutes = bcd2dec(data[1])

    # For 24-hour format
    hours = bcd2dec(data[2] & 0x3F)

    return hours, minutes, seconds
The function:
data = i2c.readfrom_mem(DS3231_ADDR, 0x00, 3)
Will read the I2C slave device and takes the following:
- Slave address which is DS3231 address.
- Memory address to be read which is 0x00 (seconds).
- Size of the data to be read which is 3.
The function returns to data array of the read values as following:
- data[0]-> Seconds.
- data[1]-> Minutes.
- data[2]-> Hours.
The rest is converting the BCD to dec to be readable.
# BCD to Decimal
def bcd2dec(bcd):
    return (bcd >> 4) * 10 + (bcd & 0x0F)
In while 1 loop:
while True:
h, m, s = read_time()
print(f"{h:02}:{m:02}:{s:02}")
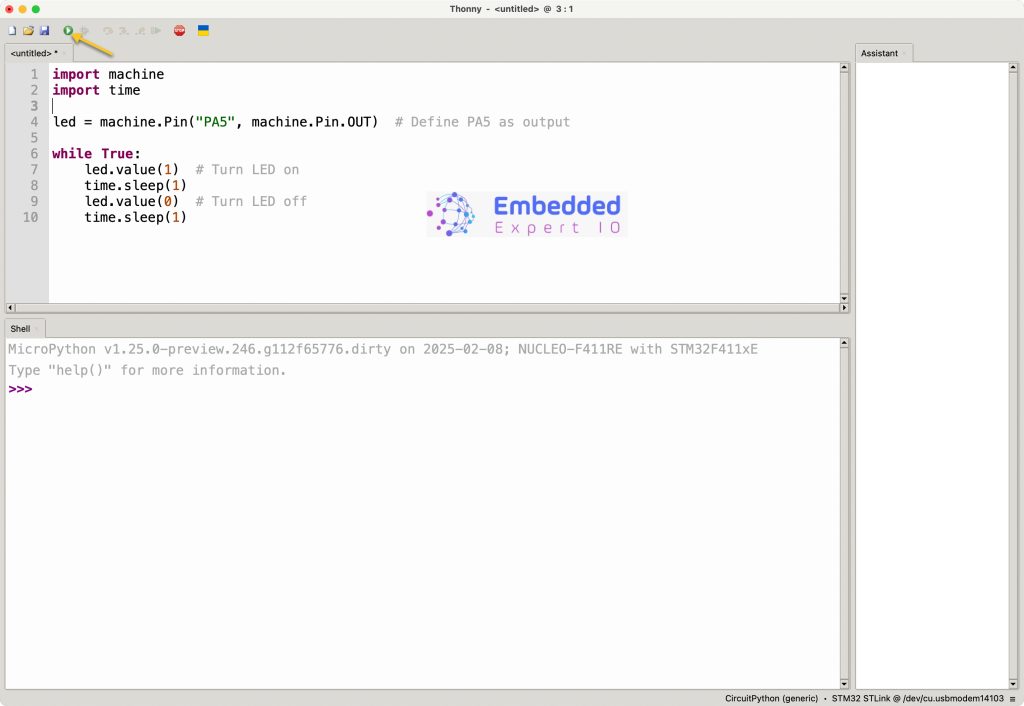
time.sleep(1)Hence, the entire code as following:
from machine import I2C, Pin
import time

# BCD to Decimal
def bcd2dec(bcd):
    return (bcd >> 4) * 10 + (bcd & 0x0F)

# Initialize I2C (adjust pins to your STM32F411 board)
i2c = I2C(1,freq=100_000)

DS3231_ADDR = 0x68  # I2C address for DS3231

def read_time():
    # Read from register 0x00 to 0x02: seconds, minutes, hours
    data = i2c.readfrom_mem(DS3231_ADDR, 0x00, 3)

    seconds = bcd2dec(data[0])
    minutes = bcd2dec(data[1])

    # For 24-hour format
    hours = bcd2dec(data[2] & 0x3F)

    return hours, minutes, seconds

while True:
    h, m, s = read_time()
    print(f"{h:02}:{m:02}:{s:02}")
    time.sleep(1)
Click on run as following:
3. Connection:
The connection as following:
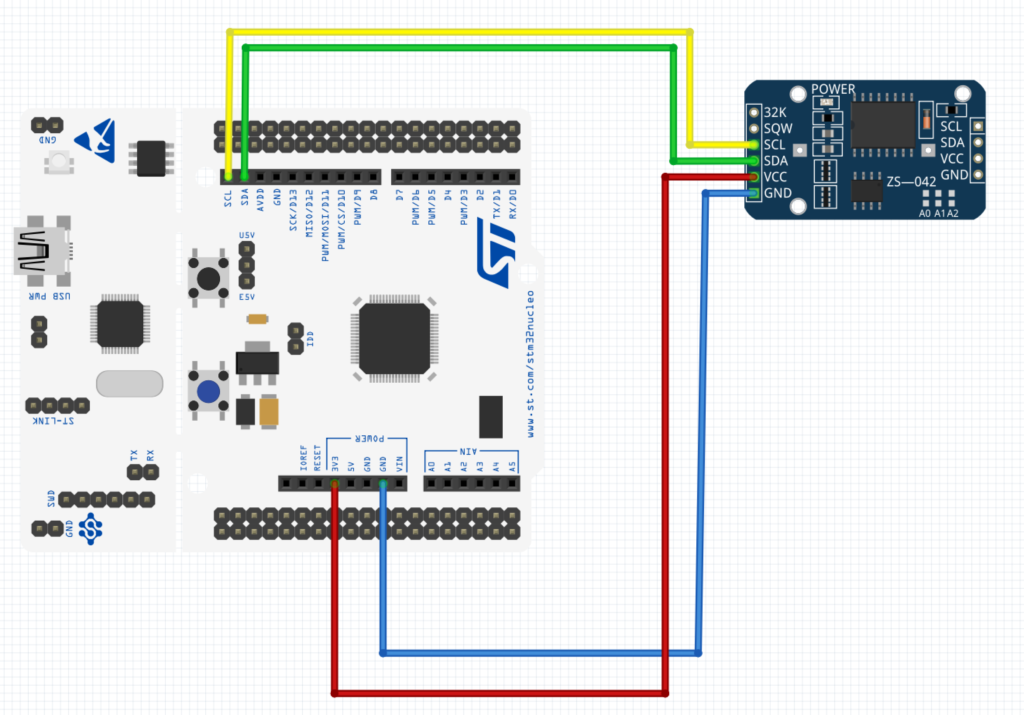
| STM32L053-Nucleo64 | DS3231 module |
| 5V | Vcc |
| GND | GND |
| D15 (PB8) | SCL |
| D14 (PB9) | SDA |
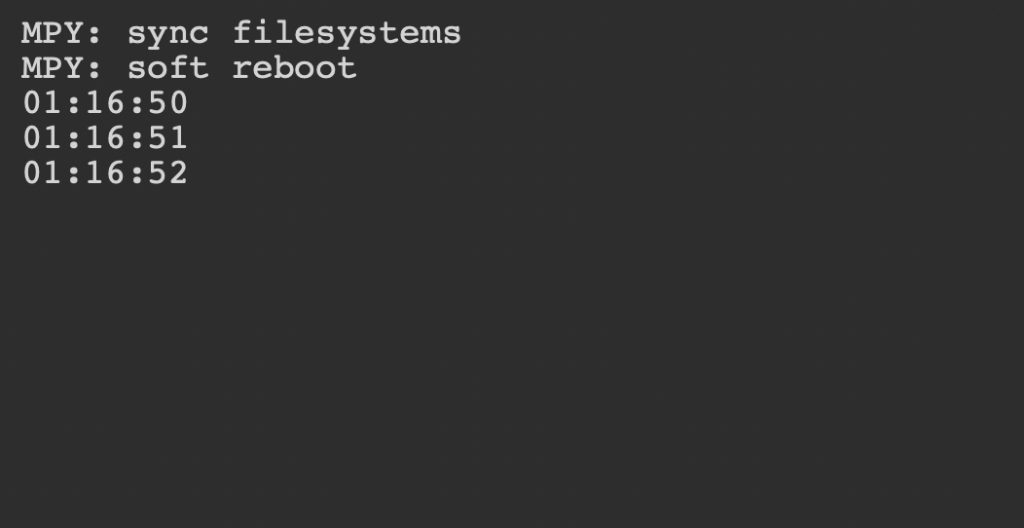
4. Results:
In the shell, you should see the results as following:
Happy coding 😉
Add Comment