
In previous two guides (Understanding GPIOs and Understanding the Systick Timer) we explained how to use GPIOs in both input mode and output mode and how to use SysTick timer to generate delay.
Delay is a function thats block the cpu for certain of time and can’t move beyond this point until the delay time is elapsed. This can be cause unpredictable system behavior in certain situations where the main loop must be as fast as possible and you want to toggle the led every second to inform the use that the main loop is working without any issue. Hence, we will be using the Systick Timer in interrupt mode to generate an interrupt every 1 milliseconds and increment an counter.
We will cover in this guid the following:
- Configuring the GPIO PA5 as output.
- Configure SysTick in interrupt mode.
- Required parts.
- Code.
- Code explanation.
1. Configuring PA5 as output
Since STM32F411RE Nucelo has built-in LED which is connected to PA5 as mention in the reference manual of Nucelo-64. Hence we the Following steps:
- Enable clock access to GPIOA
- Set PA5 as Output
In order to enable clock access to GPIO Port A, we need to locate which bus is the GPIOA is connected to. This information can be found in the datasheet of the STM32F411RE.
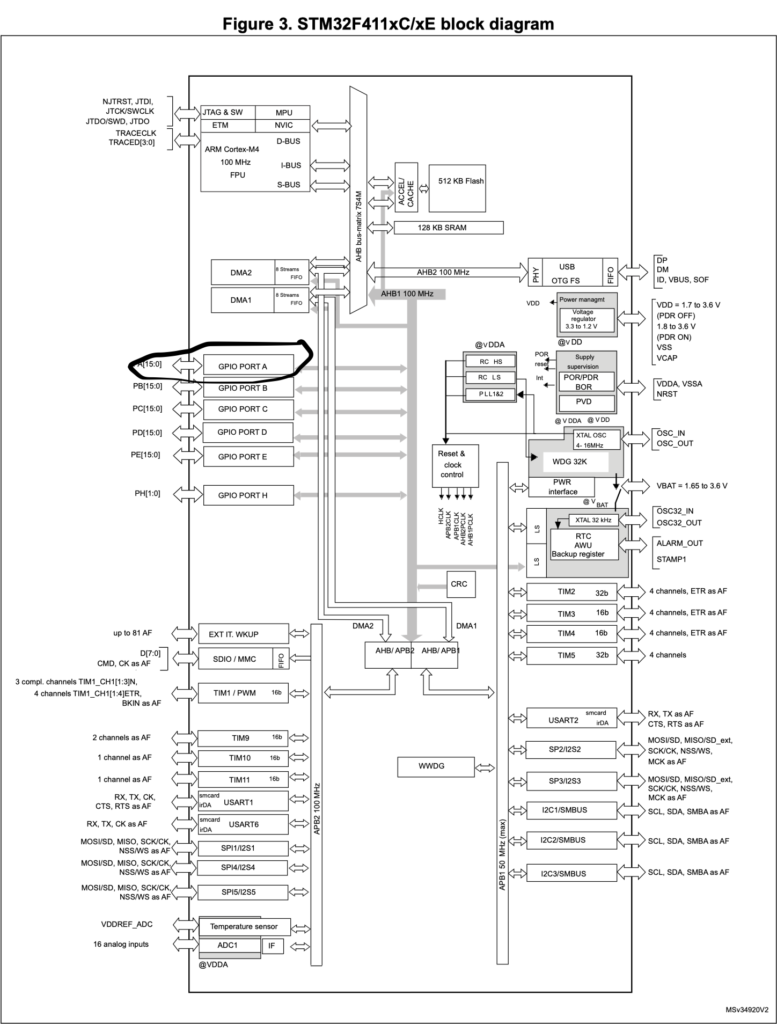
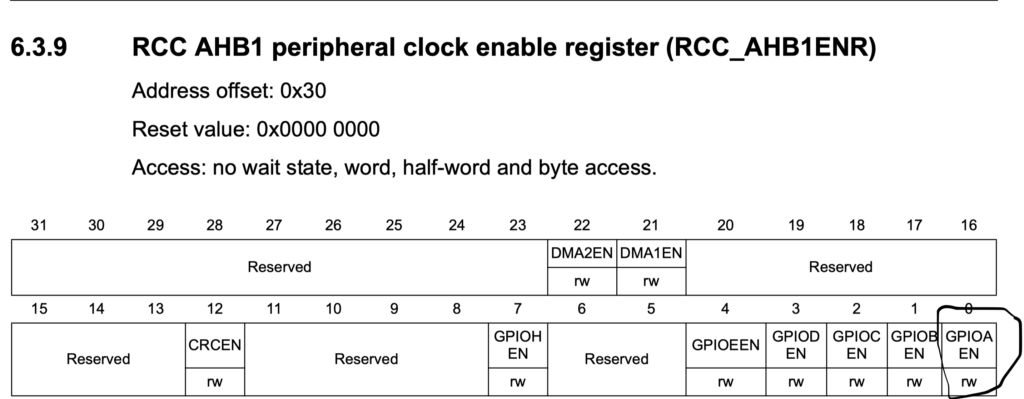
As the figure, the GPIO Port A is connected to AHB1 (Advanced High-performance Bus ) Bus. After that we need to enable the clock access to the port by heading to reference manual and check the clock enable of AHB1 register.
Then we need to configure pin PA5 as output. The pin can be set as output using MODER register which can be found in GPIO section.
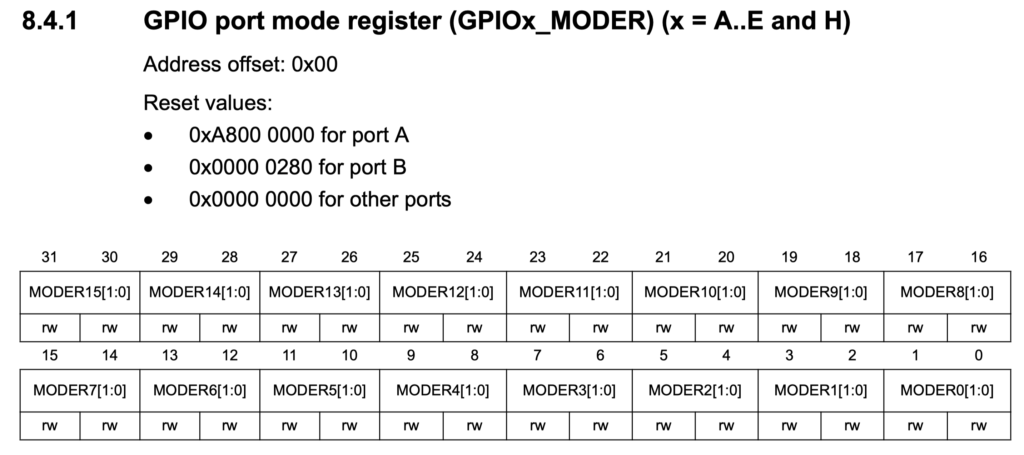
We need to set MODER5 as output hence bit number 10.
Then we can use ODR (Output Data Register) to turn on/off the led
2. Configure SysTick Timer in Interrupt mode
In order to configure Systick Timer in interrupt mode, we need the following steps
- Disable Systick Timer (SysTick->CTRL=0;).
- load value 16000-1 for 1mS operation (SysTick->LOAD=16000-1;).
- Select clock source to processor clock, enable interrupt and start counter (SysTick->CTRL=7;)
3. Required part
Here we only need STM32F411RE Nucleo-64 since it has built-in led to test the functionality.
4. Code
#include "stm32f4xx.h"                  // Device header
#include "stdint.h"
#define rate 1000
uint64_t previous; //variable to store the time
volatile uint64_t ms,rms; //ms current millis, rms return current ms when millis() function is called

uint64_t millis(void)
	{
	__disable_irq();
	rms=ms; //store current ms in rms
	__enable_irq();
	return rms;
	}
int main(void)
	{
	__disable_irq();

	SysTick->LOAD=16000-1;
	SysTick->VAL=0;
	SysTick->CTRL=7; //0b00000111;
	RCC->AHB1ENR |=RCC_AHB1ENR_GPIOAEN;
	GPIOA->MODER|= GPIO_MODER_MODER5_0; //PA5 as output
	__enable_irq();


while(1)
	{
	if(millis()-previous>rate) //if current time is elapsed, execute the if condition
		{
		GPIOA->ODR^=GPIO_ODR_OD5;
		previous=millis();
		}

	}


	}


void SysTick_Handler(void){
ms++;
}
Compile and upload the code to the Nucleo-64 board and you will see that the led is blinking every second.
5. Code Explanation
we starting by including the required header file
#include "stm32f4xx.h"                  // Device header
#include "stdint.h"
then declare some required variables and constants. The reason behind using volatile is to opt-out compiler optimization and this value can be changed during code execution .
#define rate 1000 //rate of toggling
uint64_t previous; //variable to store the time
volatile uint64_t ms,rms; //ms current millis, rms return current ms when millis() function is called
Now the millis function to return the time in milliseconds
uint64_t millis(void)
	{
	__disable_irq(); //disable all interruot
	rms=ms; //store current ms in rms
	__enable_irq(); //enable all interrupt
	return rms; //return the value
	}
Main function
int main(void)
	{
	__disable_irq();
	SysTick->LOAD=16000-1;
	SysTick->VAL=0;
	SysTick->CTRL=7; //0b00000111;
	RCC->AHB1ENR |=RCC_AHB1ENR_GPIOAEN;//enable clock access to port a
	GPIOA->MODER|= GPIO_MODER_MODER5_0; //PA5 as output
	__enable_irq();


while(1)
	{
	if(millis()-previous>rate) //if current time is elapsed, execute the if condition
		{
		GPIOA->ODR^=GPIO_ODR_OD5; //toggle the led
		previous=millis(); //store current time
		}

	}

	}
Lastly, SysTick interrupt handler
void SysTick_Handler(void){
ms++;
}
4 Comments
I need code abut cnc size small write with pencil can you help me code
I fount this article which is a good point to start developing GCODE using stm32
https://hackaday.io/project/162136-super-gerbil-the-stm32-based-gcode-controller
Add Comment