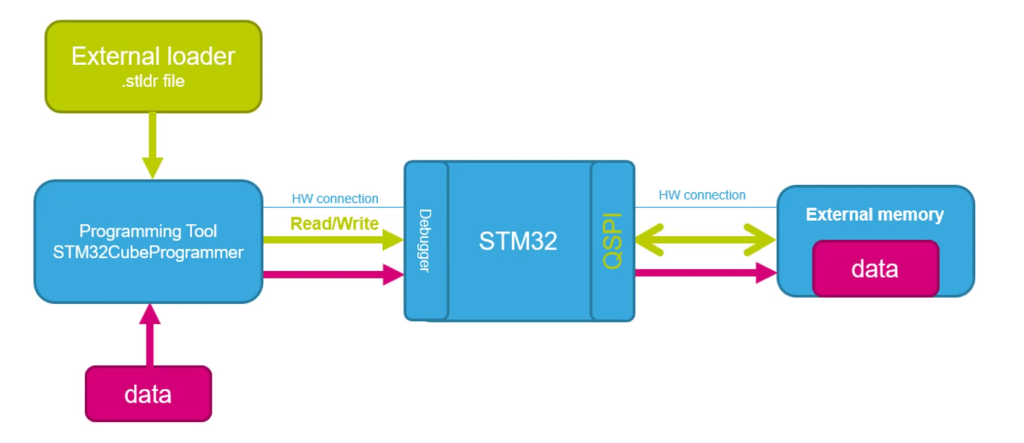
In the third part of external loader, we shall develop the external loader and test it.
In this guide, we shall cover the following:
- Getting the required files.
- Modify the file.
- Building the external loader.
- Testing the external loader.
- Project download.
10. Getting the required files.
ST offers the required files on their repository on Github which can be downloaded from here.
Download all four files.
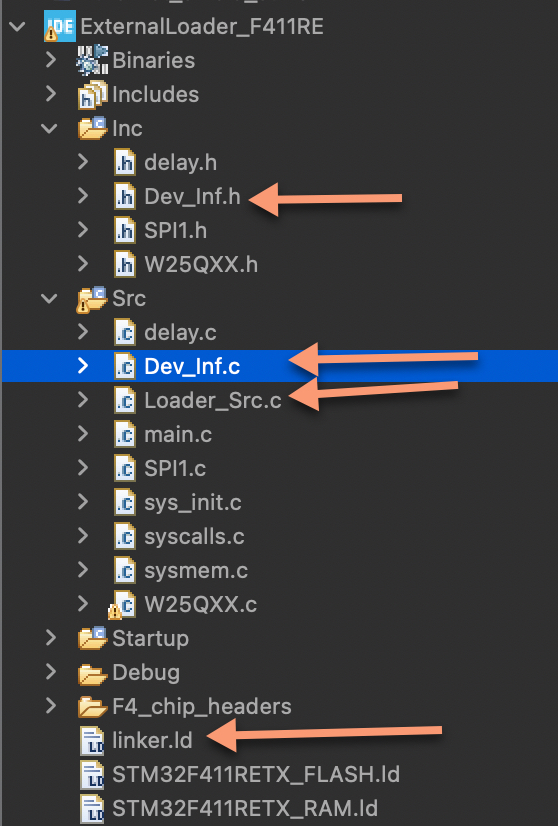
Copy Dev_Inf.h to inc folder.
Copy both Dev_Inf.c and Loader_Src.c to src folder.
Copy linker.ld to main to main project folder.
The setup as following:
11. Modify the files:
Open the Dev_Inf.c source file and include the W25QXX.h header file as following:
#include "W25Qxx.h"
In the data structure, give the external loader a name like this:
"W25Q32_ExternalLoader_SPI_F411RE"
Specify the address to be used, in this case, 0xC0000000 (You can leave it for the default one since it is mapped to QSPI or any other address, just make sure it is not being used by any other peripheral).
0xC0000000
Make sure the initial content is 0xFF
Now, open the Loader_Src.c source file and include the following:
#include "W25Qxx.h"
#include "stm32f4xx.h"
#include "SPI1.h"
#include "delay.h"
In Init function, replace the content of the function with the following:
*(uint32_t*)0xE000EDF0 = 0xA05F0000; //enable interrupts in debug


    SystemInit();

    /* ADAPTATION TO THE DEVICE
     *
     * change VTOR setting for H7 device
     * SCB->VTOR = 0x24000000 | 0x200;
     *
     * change VTOR setting for other devices
     * SCB->VTOR = 0x20000000 | 0x200;
     *
     * */

    SCB->VTOR = 0x20000000 | 0x200;

    __set_PRIMASK(0); //enable interrupts

	SPI1_Pins_Init();
	W25QXX_CS_Pins_Init();
	SPI1_Config();
	delay_init(16000000);

    flash_Reset();

    __set_PRIMASK(1); //disable interrupts
    return LOADER_OK;
During the initialization, we are initialize the SPI, pins, delay and reset the flash to ensure stability.
Modify the read/write function as following:
int Write(uint32_t Address, uint32_t Size, uint8_t* buffer) {

    __set_PRIMASK(0); //enable interrupts

    flash_WriteMemory(buffer, Address, Size);

    __set_PRIMASK(1); //disable interrupts
    return LOADER_OK;
}

int Read (uint32_t Address, uint32_t Size, uint8_t* buffer){
    __set_PRIMASK(0); //enable interrupts

	flash_ReadMemory(Address, Size, buffer);

    __set_PRIMASK(1); //disable interrupts
	return 1;
}
Note: we are maintaining the same name of the function to ensure that external loader will work.
For sector erase:
int SectorErase(uint32_t EraseStartAddress, uint32_t EraseEndAddress) {

    __set_PRIMASK(0); //enable interrupts

    flash_SectorErase(EraseStartAddress, EraseEndAddress);

    __set_PRIMASK(1); //disable interrupts
    return LOADER_OK;
}
For mass erase:
int MassErase(void) {

    __set_PRIMASK(0); //enable interrupts

    flash_ChipErase();

    __set_PRIMASK(1); //disable interrupts
    return LOADER_OK;
}
Check sum function:
uint32_t CheckSum(uint32_t StartAddress, uint32_t Size, uint32_t InitVal) {
    uint8_t missalignementAddress = StartAddress % 4;
    uint8_t missalignementSize = Size;
    int cnt;
    uint32_t Val;

    StartAddress -= StartAddress % 4;
    Size += (Size % 4 == 0) ? 0 : 4 - (Size % 4);

    for (cnt = 0; cnt < Size; cnt += 4) {
        Val = *(uint32_t*) StartAddress;
        if (missalignementAddress) {
            switch (missalignementAddress) {
                case 1:
                    InitVal += (uint8_t) (Val >> 8 & 0xff);
                    InitVal += (uint8_t) (Val >> 16 & 0xff);
                    InitVal += (uint8_t) (Val >> 24 & 0xff);
                    missalignementAddress -= 1;
                    break;
                case 2:
                    InitVal += (uint8_t) (Val >> 16 & 0xff);
                    InitVal += (uint8_t) (Val >> 24 & 0xff);
                    missalignementAddress -= 2;
                    break;
                case 3:
                    InitVal += (uint8_t) (Val >> 24 & 0xff);
                    missalignementAddress -= 3;
                    break;
            }
        } else if ((Size - missalignementSize) % 4 && (Size - cnt) <= 4) {
            switch (Size - missalignementSize) {
                case 1:
                    InitVal += (uint8_t) Val;
                    InitVal += (uint8_t) (Val >> 8 & 0xff);
                    InitVal += (uint8_t) (Val >> 16 & 0xff);
                    missalignementSize -= 1;
                    break;
                case 2:
                    InitVal += (uint8_t) Val;
                    InitVal += (uint8_t) (Val >> 8 & 0xff);
                    missalignementSize -= 2;
                    break;
                case 3:
                    InitVal += (uint8_t) Val;
                    missalignementSize -= 3;
                    break;
            }
        } else {
            InitVal += (uint8_t) Val;
            InitVal += (uint8_t) (Val >> 8 & 0xff);
            InitVal += (uint8_t) (Val >> 16 & 0xff);
            InitVal += (uint8_t) (Val >> 24 & 0xff);
        }
        StartAddress += 4;
    }

    return (InitVal);
}
Finally the verify function:
uint64_t Verify (uint32_t MemoryAddr, uint32_t RAMBufferAddr, uint32_t Size, uint32_t missalignement){
	__set_PRIMASK(0); //enable interrupts

	uint32_t VerifiedData = 0, InitVal = 0;
    uint64_t checksum;
    Size *= 4;

	uint8_t Buffer[2];
	uint32_t posBuf;

	checksum = CheckSum((uint32_t)MemoryAddr + (missalignement & 0xf), Size - ((missalignement >> 16) & 0xF), InitVal);

	while (Size>VerifiedData)
	{
		flash_ReadMemory(MemoryAddr+VerifiedData, 2, Buffer);

		posBuf=0;
		while ((Size>VerifiedData) && (posBuf<1024)) {
			if (Buffer[posBuf] != *((uint8_t*)RAMBufferAddr+VerifiedData))
			{
				__set_PRIMASK(1); //disable interrupts
				return ((checksum<<32) + MemoryAddr+VerifiedData);
			}
			posBuf++;
			VerifiedData++;
		}
	}
	__set_PRIMASK(1); //disable interrupts
	return (checksum<<32);
}
Now compiler the code and it should say compiled successfully.
11. Building the External Loader:
Now, right click on the project and select properties:
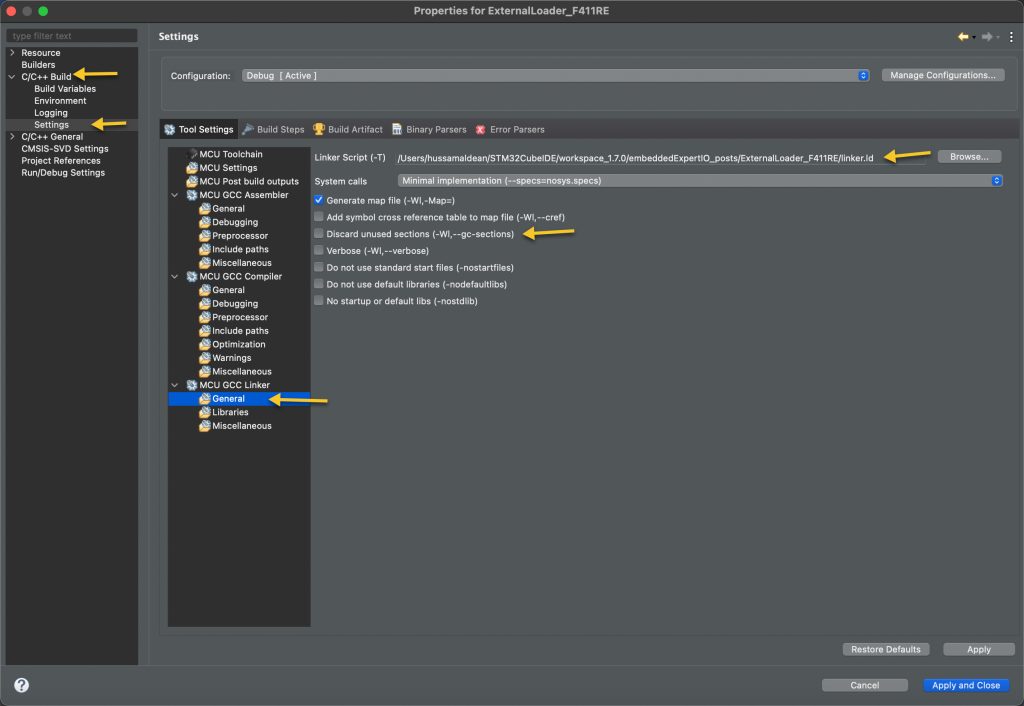
In C/C++ settings, MCU GCC Linker, General, select the linker script provided by ST.
Also, uncheck discard unused sections.
After that, in Build steps:
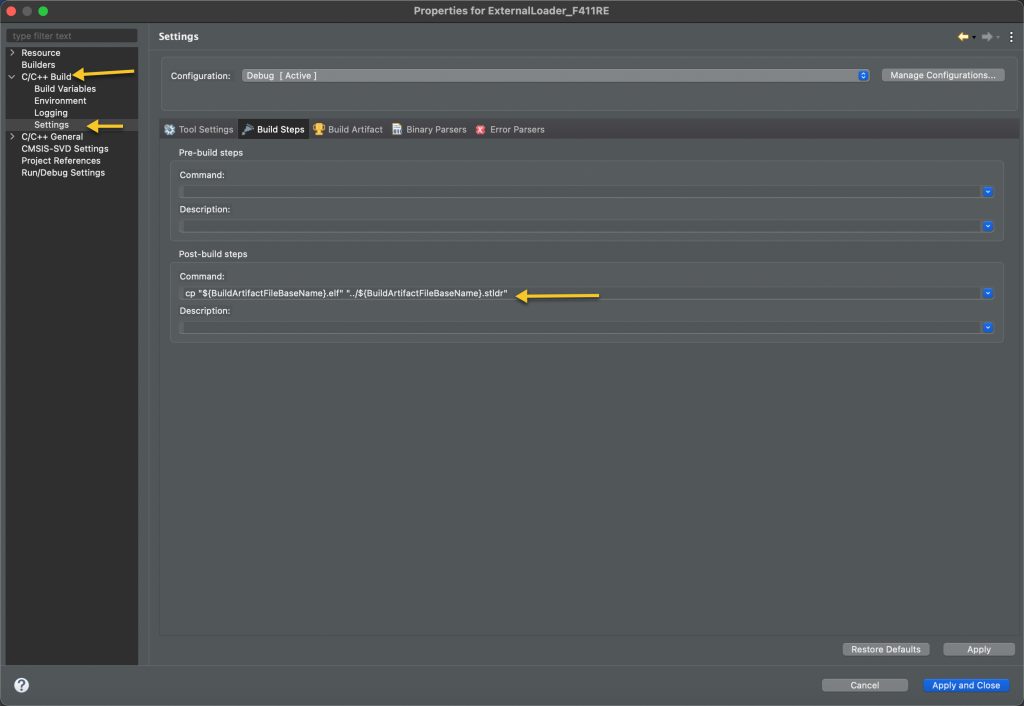
Add the following for the post build:
For macOS users:
cp "${BuildArtifactFileBaseName}.elf" "../${BuildArtifactFileBaseName}.stldr"For windows user:
cmd.exe /C copy /Y "${BuildArtifactFileBaseName}.elf" "..\${BuildArtifactFileBaseName}.stldr"Press Apply and close.
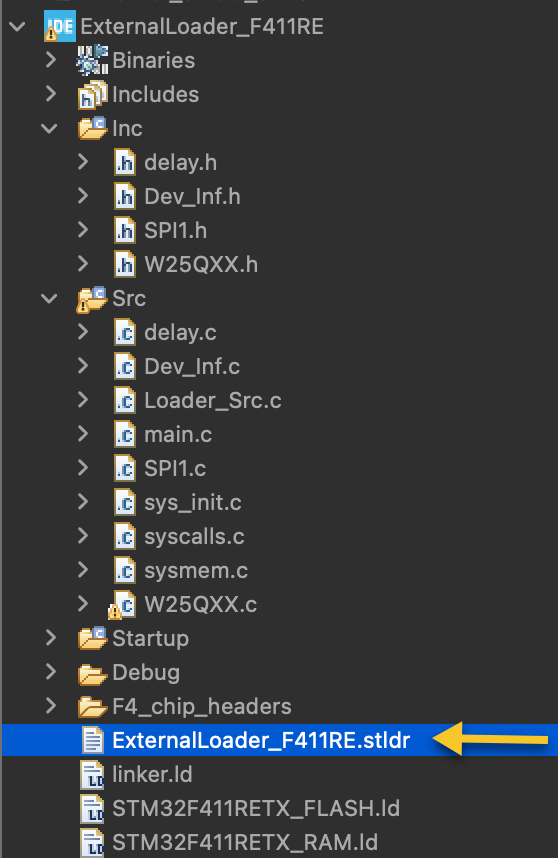
Compile the code and you should see the new linker script file as following:
Now, copy the file to STM32CubeProg to the following path:
For windows:
C:\Program Files\STMicroelectronics\STM32Cube\STM32CubeProgrammer\bin\ExternalLoader
For macOS users:
/Applications/STMicroelectronics/STM32Cube/STM32CubeProgrammer/STM32CubeProgrammer.app/Contents/MacOs/bin
Right click on the app and select show package contents.
12. Testing the external Loader:
Open STM32CubeProg and select external loader:
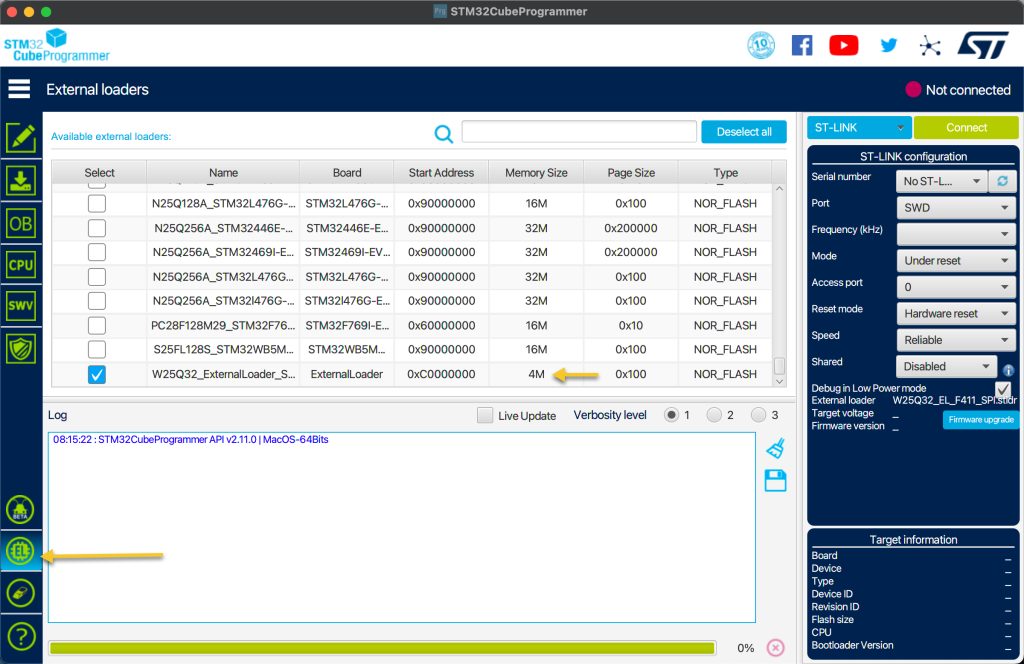
Now, connect the MCU, select External Loader and you should see our external loader.
Next, go this website and to generate random binary bin file according to your W25QXX size (4MB in this case):
Open erase and programming from STM32CubeProgrammer, select the random generated bin file, and enter the correct the address as following:
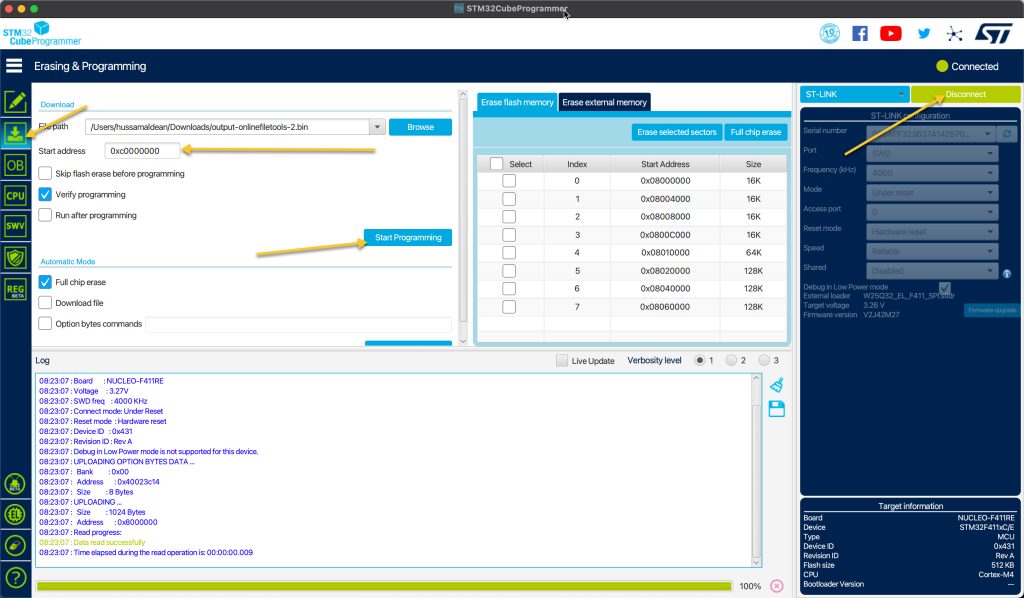
It will take a while to write the data (due to slow nature of SPI).
After flashing and verifying the flash, you should get the following two messages:
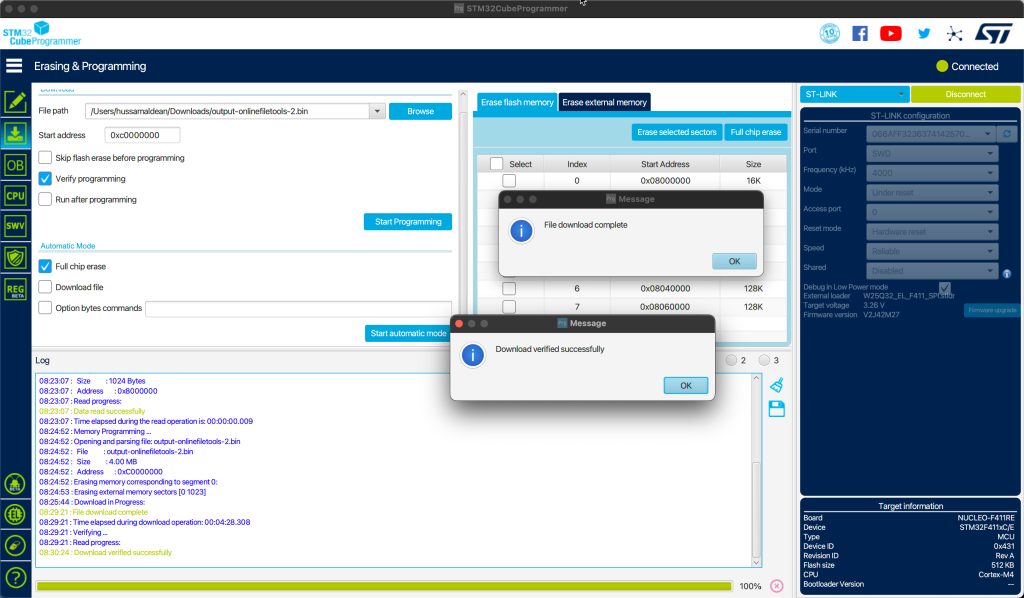
Congratulations, the external loader is working like a charm.
13. Project download:
/you may download the project from here:
Happy coding 🙂
Add Comment