
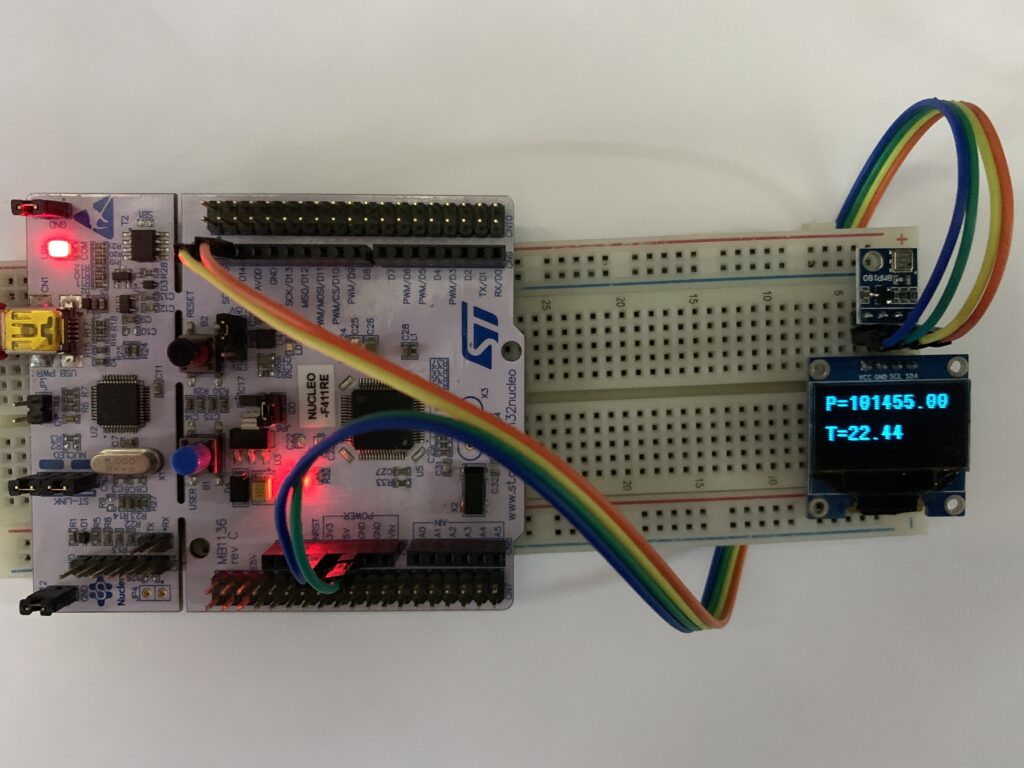
In this guide, we shall use STM32 to acquire data from BMP180 temperature and pressure sensor and display the results on OLED display.
In this guide, we shall cover the following:
- BMP180 Sensor.
- Connection with STM32.
- Code.
- Results.
1.1 BMP180 sensor:
What is Atmospheric Pressure and BMP 180 Atmospheric Pressure Sensor? BMP 180 atmospheric pressure sensor is a such type of sensor which is mainly used for measuring atmospheric pressure or biometric pressure. If we talk about pressure, then pressure is a force that effect on per unit area .The unit, which is commonly used for pressure is pound per square inch means when one pound force presses one square inch area then this pressure is called one psi. The SI unit of pressure is newton per square meter which is called one pascal (Pa). There are so many situations when we measure the pressure but here we are only interested in atmospheric pressure. Atmospheric pressure is basically the force, whose effect is existed on all the surrounding things. Means, the weight of gases in atmosphere creates the atmospheric pressure.
For measuring the pressure of these gases atmospheric pressure sensor is used. It is a high precision low cost sensing solution and especially designed for consumer applications such as weather forecast, sports devices ,GPS, computer peripherals, indoor navigation, hobby projects and vertical velocity indication etc. It can also be used as an altimeter because pressure is changed with altitude. It is easy to use and easy to solder on printed circuit board(PCB) as well as it has small size and consume less power. If it used as a temperature sensor then it is prefect sensor. It is easily available on market or online shop. A simple BMP 180 atmospheric pressure sensor is shown in figure 1
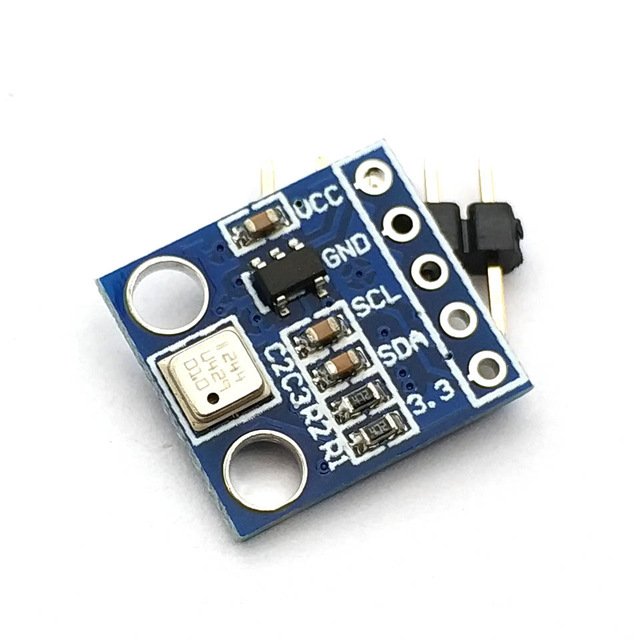
Pinout
Picture above shows the pinout of this sensor. It works on I2C communication protocol. It consists of four pins as shown in table below:
| Pins | Function |
|---|---|
| Vin ( Power supply pin ) | Connect 3.3 volts to this pin |
| GND | GND pin of power supply |
| SCL ( I2C clock pin ) | Connect with SCL pin of any microcontroller |
| SDA (I2C data pin ) | Connect with SDA pin of any microcontroller |
1.2: BMP180 Applications:
- Indoor navigation
- GPS-enhancement for dead-reckoning, slope detection, etc.
- Sport devices, e.g. altitude profile
- Weather forecast
- Vertical velocity indication (rise/sink speed)
1.3 Sensor Operation:
Sensor operation
The BMP180 comes as a fully calibrated, ready-to-use sensor module without the need for additional external circuitry. Pressure and temperature data are provided as 16 bit values, which, together with the stored cali- bration data, are used for temperature compensation on the external microcontroller. Data transfer can be performed via I2C or SPI interfaces.
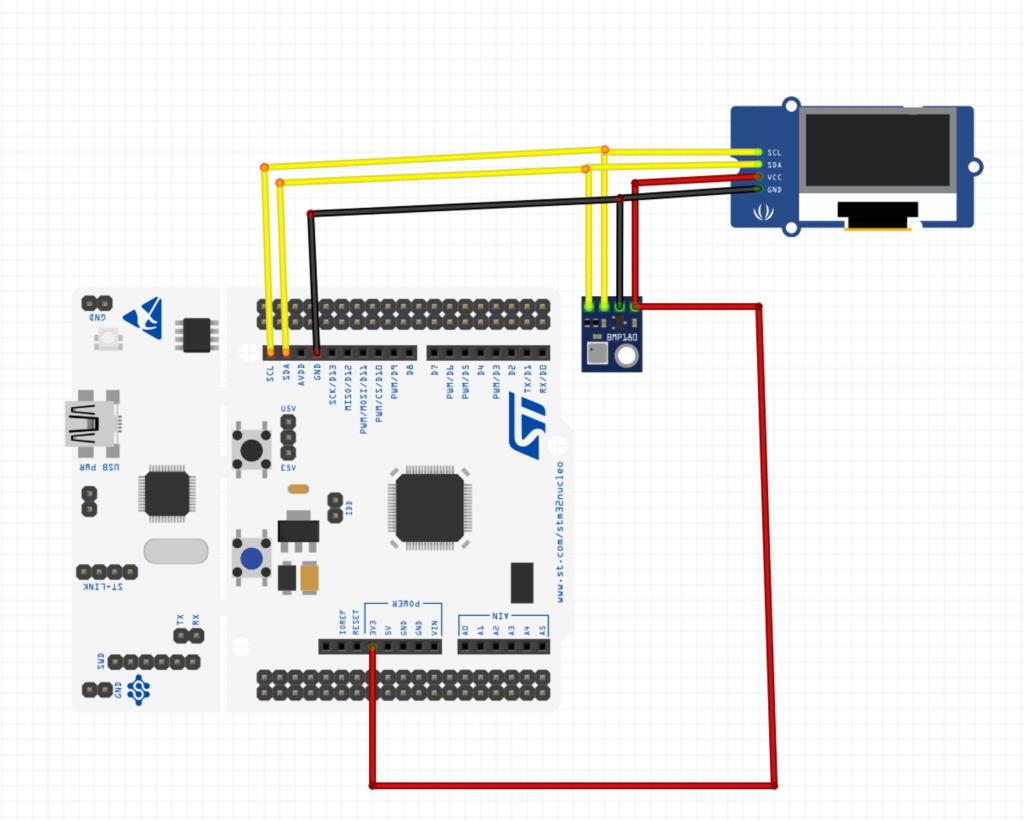
2. Connection with STM32:
3. Code:
We start of creating a header file with name of bmp180.h
#ifndef BMP180_H_
#define BMP180_H_
#include "stdio.h"


typedef enum
	{
	OSS0=0,
	OSS1=1,
	OSS2=2,
	OSS3=3
	}OSS;


void BMP180_init();

void update_BMP180(OSS OSS);
float get_temperature(void);
float get_pressure(void);

#endif /* BMP180_H_ */
Now we can create the bmp180.c
We start off by including bmp180.h as following:
#include "BMP180.h"
Another header files required as following:
#include "i2c.h"
#include "delay.h"
#include "math.h"
Then we define some macros for the slave device:
#define BMP_180_add 0x77
From the datasheet, we need to read the calibration:
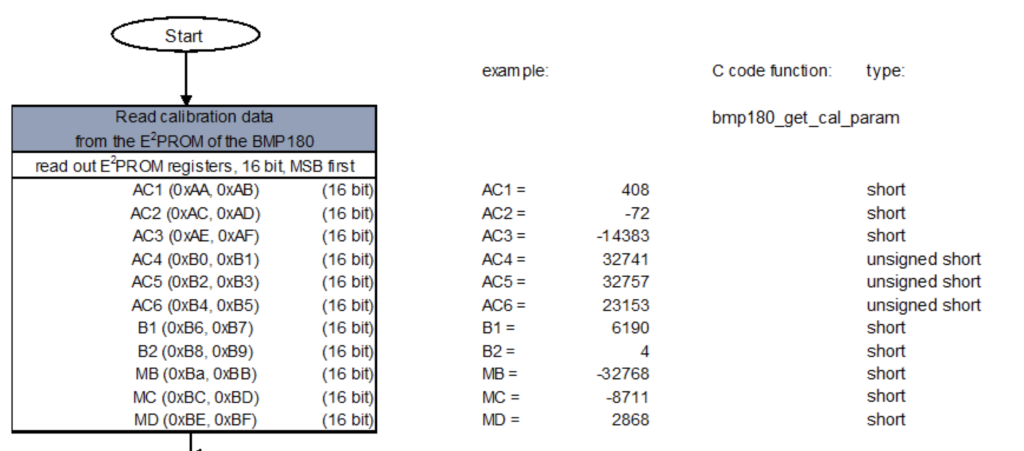
Since the start address is 0xAA, we can create a macro for that as following:
#define EEPROM_St_add 0xAA
Since the calibration data is 11 variable of 16-bit, we can create an array to hold 22 byte as following:
uint8_t eeprom_data[22];
variable to hold the calibration data as following:
short AC1,AC2,AC3,B1,B2,MB,MC,MD;
unsigned short AC4,AC5,AC6;
variable to hold uncompensated temperature and pressure:
long UT,UP;
Variable to hold the data to be sent to the sensor:
uint8_t data_tem[2],data_pres[3];
Extra variables to hold the calculation:
long X1 = 0;
long X2 = 0;
long X3 = 0;
long B3 = 0;
long B5 = 0;
unsigned long B4 = 0;
long B6 = 0;
unsigned long B7 = 0;
long Press = 0;
A structure to hold the pressure and temperature values:
typedef struct
	{
	float temperature;
	float pressure;
	}BMP180Sensor_t;
	BMP180Sensor_t BMP180;
For initializing the sensor, we just need to read the calibration data and enable FPU in case if it is not enable as following:
void BMP180_init()
		{
			SCB->CPACR |= ((3UL << 10*2)|(3UL << 11*2)); //enable FPU

			i2c_init();
			i2c_ReadMulti(BMP_180_add,EEPROM_St_add,22,(char *)eeprom_data);
			AC1=(eeprom_data[0]<<8)+eeprom_data[1];
			AC2=(eeprom_data[2]<<8)+eeprom_data[3];
			AC3=(eeprom_data[4]<<8)+eeprom_data[5];
			AC4=(eeprom_data[6]<<8)+eeprom_data[7];
			AC5=(eeprom_data[8]<<8)+eeprom_data[9];
			AC6=(eeprom_data[10]<<8)+eeprom_data[11];
			B1=(eeprom_data[12]<<8)+eeprom_data[13];
			B2=(eeprom_data[14]<<8)+eeprom_data[15];
			MB=(eeprom_data[16]<<8)+eeprom_data[17];
			MC=(eeprom_data[18]<<8)+eeprom_data[19];
			MD=(eeprom_data[20]<<8)+eeprom_data[21];
		}
Now we can update the sensor as following:
For reading the temperature:
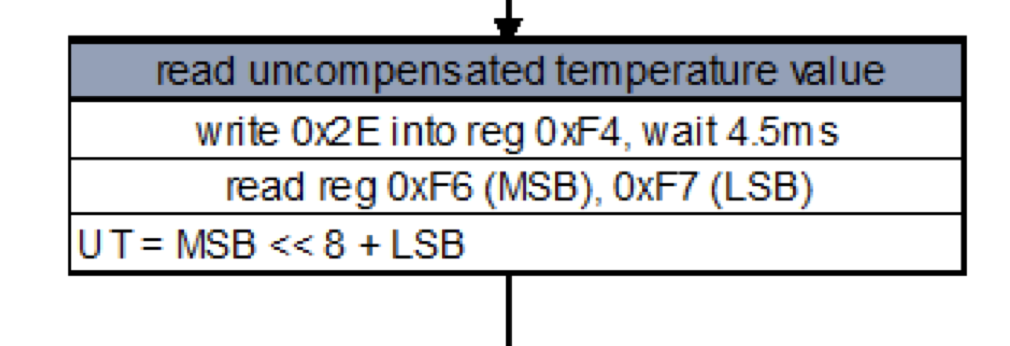
			i2c_writeByte(BMP_180_add, 0xF4, 0x2E);
			delayuS(4500);
			i2c_ReadMulti(BMP_180_add, 0xF6, 2, (char *)data_tem);
			UT=(data_tem[0]<<8)+data_tem[1];
For reading the pressure:
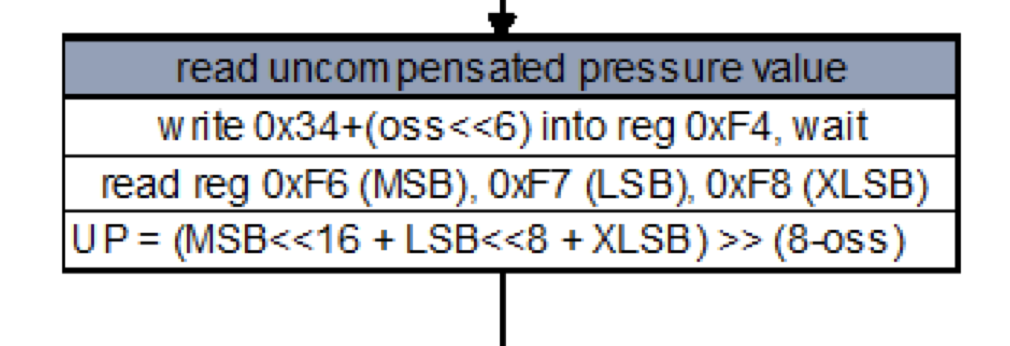
uint8_t oss;
			switch (OSS)
					{
					case OSS0: oss=0; break;
					case OSS1: oss=1; break;
					case OSS2: oss=2; break;
					case OSS3: oss=3; break;
					}

			i2c_writeByte(BMP_180_add, 0xF4, 0x34+(oss<<6));

			switch (OSS)
				{
			case OSS0: delay(5);	oss=0; break;
			case OSS1: delay(8);	oss=1; break;
			case OSS2: delay(14);	oss=2; break;
			case OSS3: delay(26);	oss=3; break;
				}

			i2c_ReadMulti(BMP_180_add, 0xF6, 3, (char *)data_pres);
			UP=((data_pres[0]<<16)+(data_pres[1]<<8)+(data_pres[2]))>>(8-oss);
After we acquired the data, we can start calculating the temperature as following:
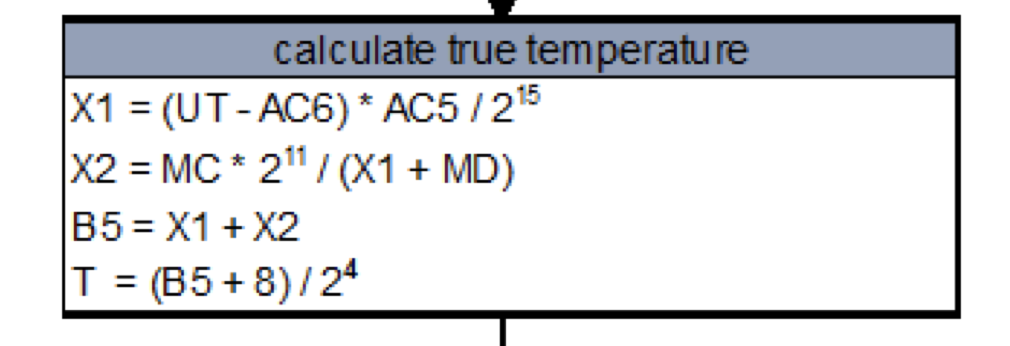
	//calculate temperature
			long x1=((UT-AC6) * (AC5/(pow(2,15))));
			long x2= ((MC)*(pow(2,11)))/(x1+MD);
			long B5= (x1+x2);
			BMP180.temperature= ((B5+8)/(pow(2,4)))/10;
for pressure:
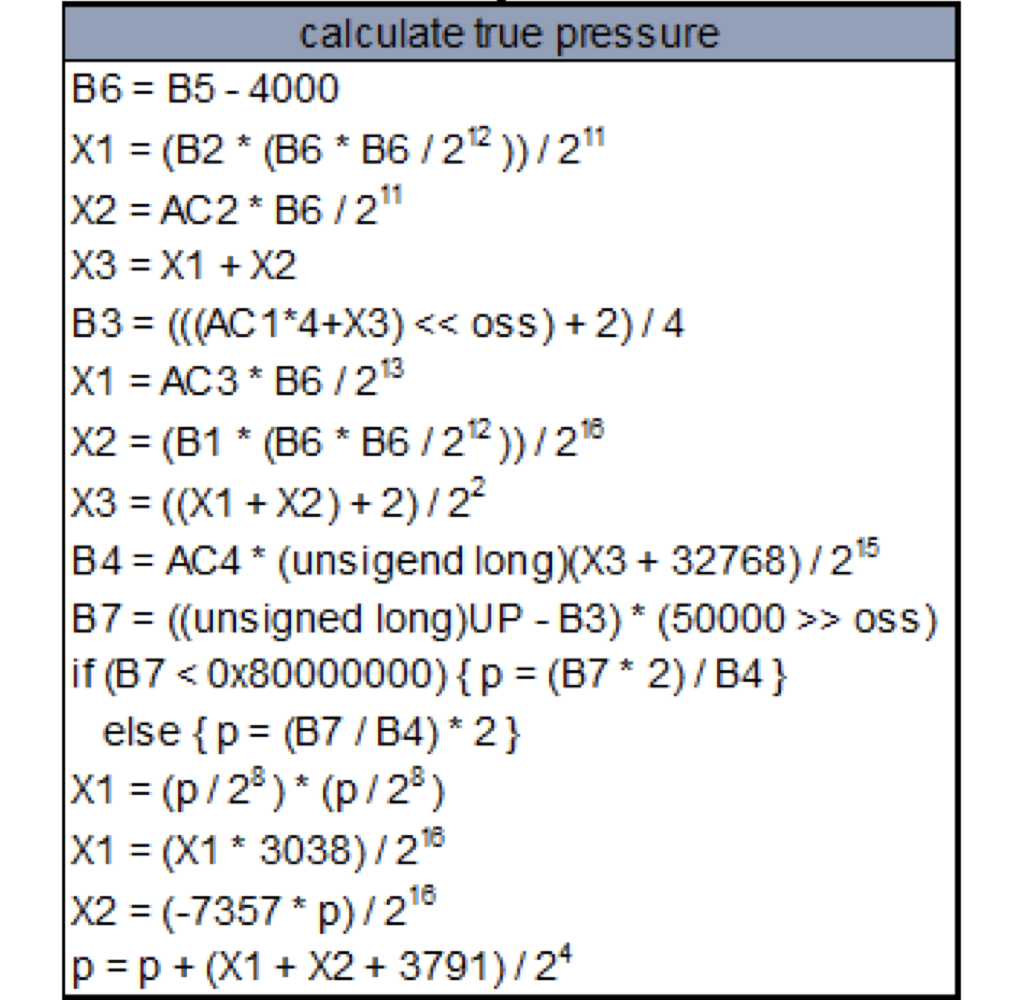
			//calculate pressure
				B6 = B5-4000;
				X1 = (B2 * (B6*B6/(pow(2,12))))/(pow(2,11));
				X2 = AC2*B6/(pow(2,11));
				X3 = X1+X2;
				B3 = (((AC1*4+X3)<<oss)+2)/4;
				X1 = AC3*B6/pow(2,13);
				X2 = (B1 * (B6*B6/(pow(2,12))))/(pow(2,16));
				X3 = ((X1+X2)+2)/pow(2,2);
				B4 = AC4*((unsigned long)(X3+32768))/(pow(2,15));
				B7 = ((unsigned long)UP-B3)*(50000>>oss);
				if (B7<0x80000000) {Press = (B7*2)/B4;}
				else {Press = (B7/B4)*2;}
				X1 = (Press/(pow(2,8)))*(Press/(pow(2,8)));
				X1 = (X1*3038)/(pow(2,16));
				X2 = (-7357*Press)/(pow(2,16));
				Press = Press + (X1+X2+3791)/(pow(2,4));
			BMP180.pressure = Press;
Hence, the entire update sensor function as following:
void update_BMP180(OSS OSS)
		{

		//update temperature

			i2c_writeByte(BMP_180_add, 0xF4, 0x2E);
			delayuS(4500);
			i2c_ReadMulti(BMP_180_add, 0xF6, 2, (char *)data_tem);
			UT=(data_tem[0]<<8)+data_tem[1];
			//update pressure
			uint8_t oss;
			switch (OSS)
					{
					case OSS0: oss=0; break;
					case OSS1: oss=1; break;
					case OSS2: oss=2; break;
					case OSS3: oss=3; break;
					}

			i2c_writeByte(BMP_180_add, 0xF4, 0x34+(oss<<6));

			switch (OSS)
				{
			case OSS0: delay(5);	oss=0; break;
			case OSS1: delay(8);	oss=1; break;
			case OSS2: delay(14);	oss=2; break;
			case OSS3: delay(26);	oss=3; break;
				}

			i2c_ReadMulti(BMP_180_add, 0xF6, 3, (char *)data_pres);
			UP=((data_pres[0]<<16)+(data_pres[1]<<8)+(data_pres[2]))>>(8-oss);

			//calculate temperature
			long x1=((UT-AC6) * (AC5/(pow(2,15))));
			long x2= ((MC)*(pow(2,11)))/(x1+MD);
			long B5= (x1+x2);
			BMP180.temperature= ((B5+8)/(pow(2,4)))/10;


			//calculate pressure
				B6 = B5-4000;
				X1 = (B2 * (B6*B6/(pow(2,12))))/(pow(2,11));
				X2 = AC2*B6/(pow(2,11));
				X3 = X1+X2;
				B3 = (((AC1*4+X3)<<oss)+2)/4;
				X1 = AC3*B6/pow(2,13);
				X2 = (B1 * (B6*B6/(pow(2,12))))/(pow(2,16));
				X3 = ((X1+X2)+2)/pow(2,2);
				B4 = AC4*((unsigned long)(X3+32768))/(pow(2,15));
				B7 = ((unsigned long)UP-B3)*(50000>>oss);
				if (B7<0x80000000) {Press = (B7*2)/B4;}
				else {Press = (B7/B4)*2;}
				X1 = (Press/(pow(2,8)))*(Press/(pow(2,8)));
				X1 = (X1*3038)/(pow(2,16));
				X2 = (-7357*Press)/(pow(2,16));
				Press = Press + (X1+X2+3791)/(pow(2,4));
			BMP180.pressure = Press;

		}
For getting the temperature and pressure:
float get_temperature(void)
	{
	return BMP180.temperature;
	}
float get_pressure(void)
	{
	return BMP180.pressure;
	}
In main.c:
#include "oled.h"
#include "BMP180.h"
extern void SysClockConfig(void);
float tmeperature,pressure;
char data_print[30];

int main(void)
{
	 SysClockConfig();
	 SSD1306_Init();
	 BMP180_init();
	while(1)
		{
		update_BMP180(OSS1);
		tmeperature=get_temperature();
		pressure=get_pressure();
		SSD1306_GotoXY(0,0);
		sprintf(data_print,"P=%0.2f",pressure);
		SSD1306_Puts(data_print,&Font_11x18, 1);
		SSD1306_GotoXY(0,30);
		sprintf(data_print,"T=%0.2f",tmeperature);
		SSD1306_Puts(data_print,&Font_11x18, 1);
		SSD1306_UpdateScreen();
		delay(1000);
		}

}
You may download the project from here:
4. Results:
Happy coding 🙂
Add Comment