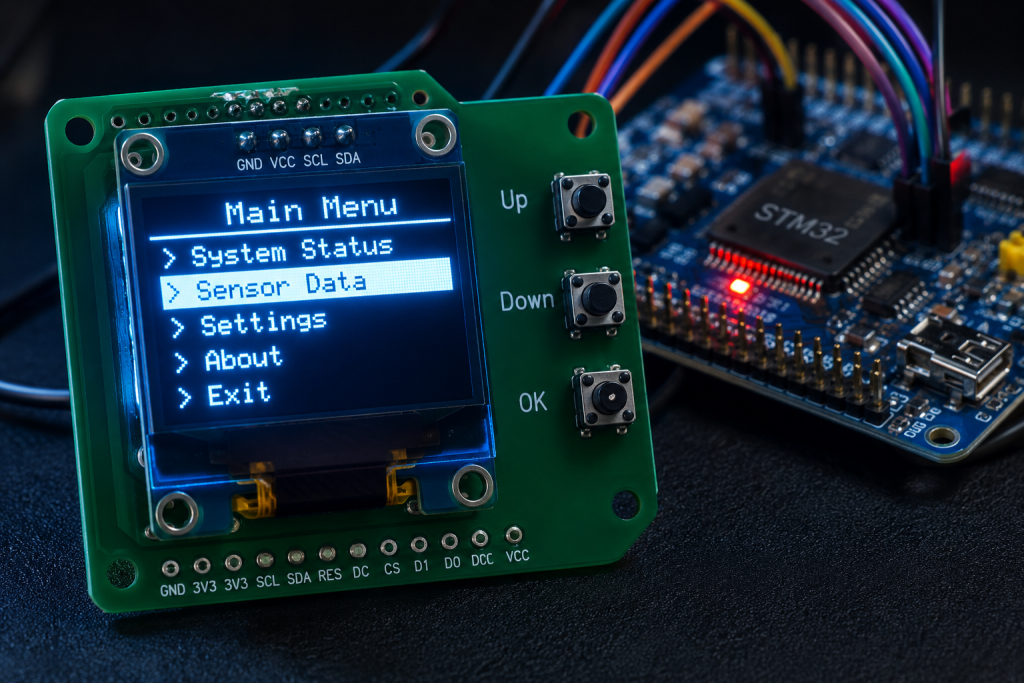
A responsive menu system is the backbone of any interactive embedded device, but navigating it without screen tearing requires careful state management. In this guide, you will learn how to build a sleek, zero-flicker OLED menu using U8g2 that is driven by simple Up, Down, and OK push-buttons.
In this guide, we shall cover the following:
- Introduction.
- STM32CubeMX configuration.
- Firmware development.
- Results.
1. Introduction:
In the modern era of embedded systems, it is easy to assume that every project requires a capacitive-touch RGB TFT screen to provide a good user experience. We are surrounded by sleek smartphones and tablets that set a high bar for industrial design, and that expectation often bleeds into our microcontroller projects. However, reaching for a color touchscreen the moment you need to adjust a few settings often leads to unnecessary complications: inflated Bill of Materials (BOM) costs, complex GUI frameworks, steep learning curves, and fragile hardware that fails in harsh environments.
The truth is, for the vast majority of embedded devices—whether it’s a 3D printer controller, a custom audio synthesizer, a benchtop power supply, or an industrial sensor node—a classic monochrome OLED paired with a few physical push buttons remains the absolute gold standard for reliability, cost-effectiveness, and performance.
But building a robust menu system from scratch is rarely as straightforward as it seems. Any engineer who has attempted it has likely run into the same notorious pitfalls: spaghetti-code state machines that become impossible to maintain, mechanical button bouncing that causes the cursor to jump three items at a time, and—most frustrating of all—dreadful screen flicker that makes the device feel cheap and poorly engineered. Sending data byte-by-byte directly to the display controller, or hammering it with refresh commands on every single loop iteration, is a guaranteed recipe for a tearing, unresponsive interface.
In this guide, we are going to build a sleek, professional-grade menu system from the ground up using a standard 128×64 OLED, the U8g2 graphics library, and three simple push buttons: Up, Down, and OK.
We will move past the basic “Hello World” text and dive deep into embedded UI architecture. You will learn how to structure your firmware using an event-driven state machine that cleanly separates hardware input from screen rendering. We will implement a “Redraw Flag” system, ensuring the screen only updates when an actual state change occurs, completely eliminating flicker and freeing up valuable CPU cycles. We will also tackle the practical challenges of navigating nested submenus, creating scrollable lists for menus that exceed the physical height of the screen, and handling mechanical button debouncing without relying on blocking delays.
By the end of this guide, you will have a reusable, rock-solid menu framework that looks premium, responds instantly, and can be easily dropped into any future microcontroller project. Let’s dive in and build an interface that just works.
2. STM32CubeMX Configuration:
We shall continue from this guide here.
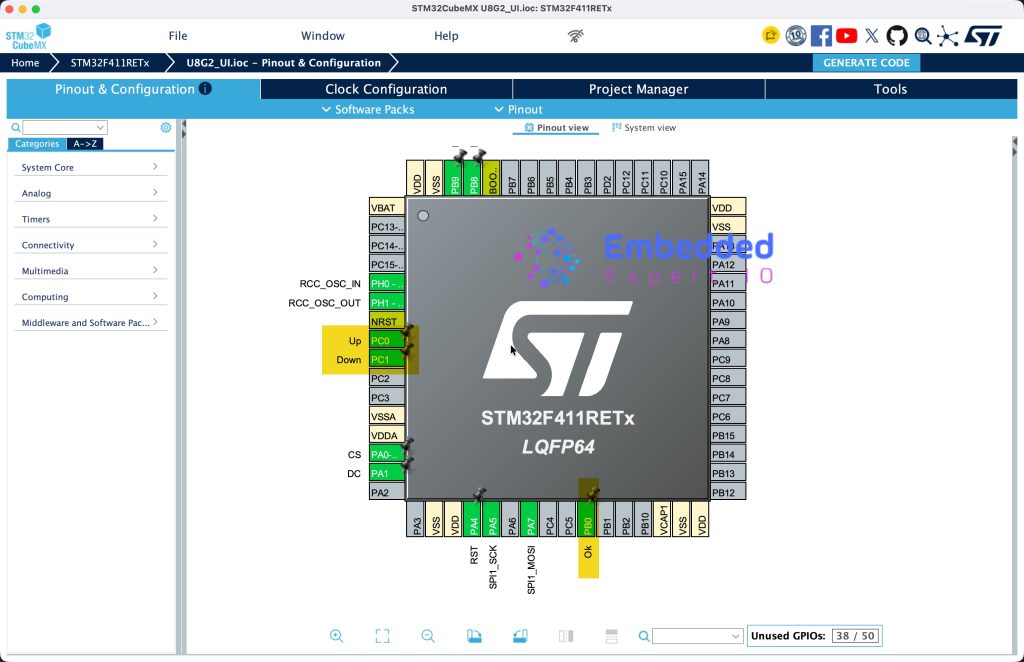
Open the project .ioc file in STM32CubeMX.
Use any three GPIO as input and give them the following name:
- Up
- Down
- Ok.
Next, from GPIO in System Core, enable the internal pullup for the select GPIO as follows:
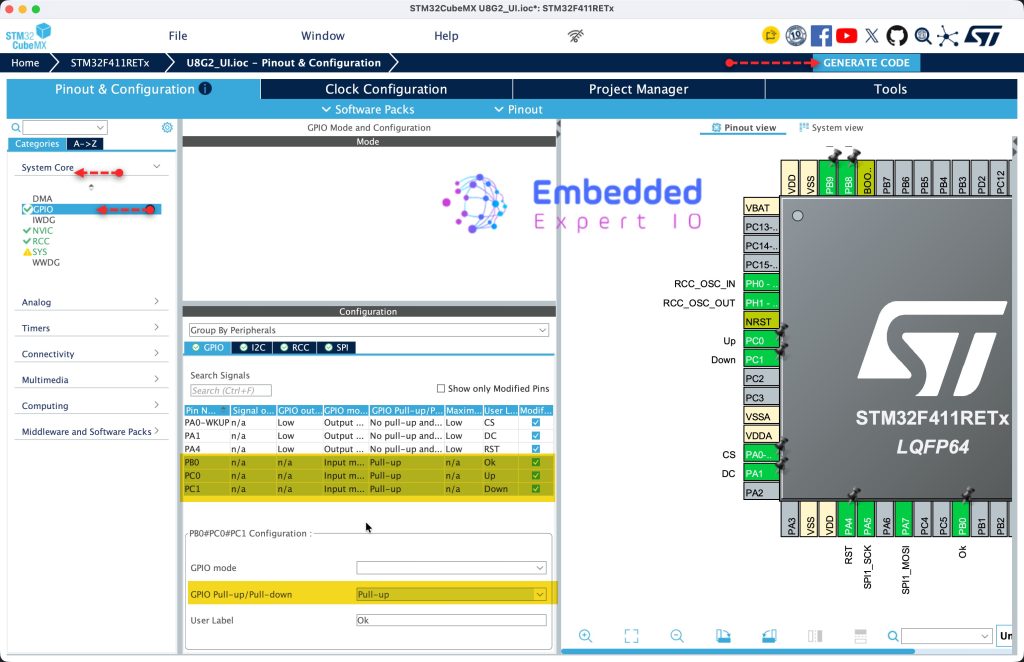
Finally click on Generate Code.
Thats all for the STM32CubeMX configuration.
3. Firmware Development:
Before heading into the development, the flow of the code as follows:
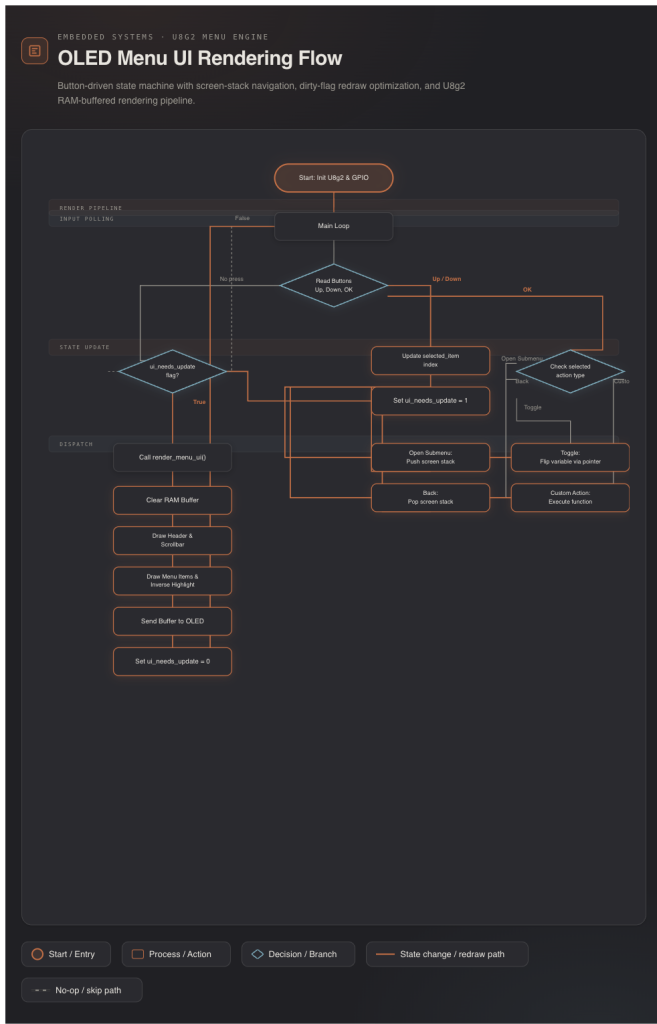
Open the project in STM32CubeIDE:
In user code begin code 0, declare the following enumeration:
typedef enum {
    MENU_ACTION_NONE,
    MENU_ACTION_OPEN_SUBMENU,
    MENU_ACTION_BACK,
    MENU_ACTION_TOGGLE,
    MENU_ACTION_ACTION_1,
    MENU_ACTION_ACTION_2
} MenuAction_t;
This enum defines the specific behaviors a menu item can trigger when its corresponding button is pressed. It acts as a clean, readable command identifier, allowing the menu’s logic to easily route user inputs to actions like opening submenus, toggling settings, or executing custom code.
Next, declare the following structures:
typedef struct {
    const char* name;
    MenuAction_t action;
    uint8_t* value_ptr;
} MenuItem_t;
This struct acts as the blueprint for an individual menu row, storing its display text, the action it triggers when selected, and a pointer to its state variable. The value_ptr is especially useful for toggle switches, allowing the code to dynamically read and flip boolean variables (like an LED state) without hardcoding them into the logic.
typedef struct {
    const char* title;
    const MenuItem_t* items;
    uint8_t item_count;
} MenuScreen_t;
This struct defines a complete menu page by grouping its header title with an array of menu items and a count of how many items it contains. It allows you to easily build a multi-level menu system by defining separate screens (like a main menu and a settings page) that the code can navigate between.
Next, declare the following constants:
const MenuItem_t sub2_items[] = {
    {"Option A", MENU_ACTION_NONE, NULL},
    {"Option B", MENU_ACTION_NONE, NULL},
    {"Option C", MENU_ACTION_NONE, NULL},
    {"Back",    MENU_ACTION_BACK,  NULL}
};
This array defines the individual rows for a submenu, specifying their display text and associated actions. The “Back” item is explicitly mapped to trigger a return to the previous screen, while the other options are currently configured as inactive placeholders.
Next, declare the two static variables:
static uint8_t setting_led_state = 1;
static uint8_t setting_buzz_state = 0;
These static variables store the live boolean states for the LED and buzzer settings, keeping them persistent in memory. By linking them to a menu item’s value_ptr, the UI can directly toggle and display their status without needing custom read/write functions for each setting.
const MenuItem_t sub1_items[] = {
    {"LED Enable",  MENU_ACTION_TOGGLE, &setting_led_state},
    {"Buzzer Enbl", MENU_ACTION_TOGGLE, &setting_buzz_state},
    {"Sub 2",       MENU_ACTION_OPEN_SUBMENU, NULL},
    {"Back",        MENU_ACTION_BACK,  NULL}
};

const MenuItem_t main_items[] = {
    {"Start System", MENU_ACTION_ACTION_1, NULL},
    {"View Data",    MENU_ACTION_ACTION_2, NULL},
    {"Settings",     MENU_ACTION_OPEN_SUBMENU, NULL},
    {"Reboot",       MENU_ACTION_NONE, NULL}
};

const MenuScreen_t screens[] = {
    {"MAIN MENU", main_items, 4},
    {"SETTINGS",  sub1_items, 4},
    {"SUB MENU 2",sub2_items, 4}
};
These arrays populate the screens with their specific items, mapping actions like toggling LEDs or opening submenus directly to the state variables and navigation logic. The screens array then compiles these individual pages into a single, easily indexable master list that the navigation engine uses to track the active UI layout.
Next, declare the following variables:
#define MAX_SCREENS_DEPTH 3
uint8_t screen_stack[MAX_SCREENS_DEPTH] = {0, 0, 0};
uint8_t screen_stack_idx = 0;
uint8_t selected_item = 0;
These variables track the navigation hierarchy and user cursor, using screen_stack as a LIFO array to remember the path through nested menus. The screen_stack_idx keeps track of the current depth, while selected_item tracks the highlighted row on the active screen.
#define MENU_FONT      u8g2_font_6x10_tr
#define MENU_FONT_REG  u8g2_font_6x10_tr
#define ITEM_HEIGHT    12
#define MAX_VISIBLE    4
These macros configure the UI’s visual layout by defining the specific U8g2 fonts used for text and the vertical pixel height of each row. The MAX_VISIBLE constant dictates exactly how many items fit on the screen at once before the scrolling logic activates.
volatile uint8_t ui_needs_update = 1;
This flag variable acts as the heart of the flicker-free rendering engine, ensuring the OLED is only redrawn when a state change actually occurs. It initializes to 1 so the main menu is drawn immediately on startup, and is later toggled by button inputs to trigger a screen refresh only when needed.
Next, the function to display the menu:
void render_menu_ui(void) {
    uint8_t current_screen_idx = screen_stack[screen_stack_idx];
    const MenuScreen_t* current_screen = &screens[current_screen_idx];

    u8g2_ClearBuffer(&myDisplay);

    // 1. Draw Title Bar
    u8g2_SetFont(&myDisplay, MENU_FONT);
    u8g2_DrawBox(&myDisplay, 0, 0, 128, 12);
    u8g2_SetDrawColor(&myDisplay, 0);
    u8g2_DrawStr(&myDisplay, 2, 10, current_screen->title);
    u8g2_SetDrawColor(&myDisplay, 1);

    // 2. Draw Scroll Indicator
    if (current_screen->item_count > MAX_VISIBLE) {
        uint8_t scroll_track_h = MAX_VISIBLE * ITEM_HEIGHT;
        uint8_t scroll_thumb_h = (scroll_track_h * MAX_VISIBLE) / current_screen->item_count;
        uint8_t scroll_thumb_y = 13 + ((selected_item * scroll_track_h) / current_screen->item_count);
        u8g2_DrawVLine(&myDisplay, 126, 13, scroll_track_h);
        u8g2_DrawBox(&myDisplay, 125, scroll_thumb_y, 3, scroll_thumb_h);
    }

    // 3. Draw Menu Items
    uint8_t start_idx = 0;
    if (current_screen->item_count > MAX_VISIBLE && selected_item >= MAX_VISIBLE - 1) {
        start_idx = selected_item - (MAX_VISIBLE - 2);
        if (start_idx + MAX_VISIBLE > current_screen->item_count) {
            start_idx = current_screen->item_count - MAX_VISIBLE;
        }
    }

    u8g2_SetFont(&myDisplay, MENU_FONT_REG);
    for (uint8_t i = 0; i < MAX_VISIBLE && (start_idx + i) < current_screen->item_count; i++) {
        uint8_t item_idx = start_idx + i;
        uint8_t y_pos = 14 + (i * ITEM_HEIGHT);

        if (item_idx == selected_item) {
            u8g2_DrawBox(&myDisplay, 0, y_pos - 1, 124, ITEM_HEIGHT);
            u8g2_SetDrawColor(&myDisplay, 0);
        } else {
            u8g2_SetDrawColor(&myDisplay, 1);
        }

        u8g2_DrawStr(&myDisplay, 2, y_pos + 7, current_screen->items[item_idx].name);

        if (current_screen->items[item_idx].action == MENU_ACTION_TOGGLE) {
            if (current_screen->items[item_idx].value_ptr != NULL) {
                uint8_t val = *(current_screen->items[item_idx].value_ptr);
                const char* state_str = val ? "[ON]" : "[OFF]";
                u8g2_DrawStr(&myDisplay, 95, y_pos + 7, state_str);
            }
        }
        u8g2_SetDrawColor(&myDisplay, 1);
    }
    u8g2_SendBuffer(&myDisplay);
}
The render_menu_ui function is the graphical engine of the menu, translating the abstract state variables into actual pixels on the OLED. Here is a text-based breakdown of how it operates in four distinct stages:
1. Screen Lookup and Buffer Clearing
The function begins by looking up the current active screen using the screen_stack and screen_stack_idx variables. Once it has a pointer to the current MenuScreen_t struct, it clears the U8g2 RAM buffer to ensure a blank canvas.
2. Drawing the Inverse Title Bar
To create a modern, high-contrast header, it draws a solid white box across the top of the screen. It then sets the draw color to 0 (inverse/black) and prints the screen’s title text inside that box, creating a white-on-black header. Finally, it resets the draw color back to 1 (white) for the rest of the drawing operations.
3. Dynamic Scrollbar Logic
If the current screen has more items than can physically fit on the OLED (item_count > MAX_VISIBLE), the scrolling engine activates.
It calculates the total height of the visible track and the height of the “thumb” (the movable scroll indicator) proportional to the total number of items. The vertical position of the thumb is calculated based on the selected_item index, giving the user an immediate visual cue of where they are in the list.
4. Windowed Item Rendering and Toggles
Because only MAX_VISIBLE items can fit on screen, the code calculates a start_idx to create a sliding “window” of items. If the user navigates past the fourth item, the window shifts down so the highlighted item stays on screen.
It then loops through the visible items:
- Highlighting: If the current item in the loop matches
selected_item, it draws a solid white box and switches the draw color to0so the text appears inverted (black on white). - Toggle States: If the item’s action is
MENU_ACTION_TOGGLE, it dereferences thevalue_ptrto check the live boolean state of that variable. It then prints[ON]or[OFF]at the right edge of that row.
Once all lines are drawn into the RAM buffer, u8g2_SendBuffer pushes the entire completed frame to the OLED in one shot, preventing any screen tearing or flickering.
Next, input handling logic:
void menu_handle_up(void) {
    uint8_t current_screen_idx = screen_stack[screen_stack_idx];
    uint8_t item_count = screens[current_screen_idx].item_count;
    if (selected_item > 0) selected_item--;
    else selected_item = item_count - 1; // Wrap around
    ui_needs_update = 1;
}

void menu_handle_down(void) {
    uint8_t current_screen_idx = screen_stack[screen_stack_idx];
    uint8_t item_count = screens[current_screen_idx].item_count;
    if (selected_item < item_count - 1) selected_item++;
    else selected_item = 0; // Wrap around
    ui_needs_update = 1;
}

void menu_handle_ok(void) {
    uint8_t current_screen_idx = screen_stack[screen_stack_idx];
    const MenuItem_t* selected_menu_item = &screens[current_screen_idx].items[selected_item];

    switch (selected_menu_item->action) {
        case MENU_ACTION_OPEN_SUBMENU:
            if (screen_stack_idx < MAX_SCREENS_DEPTH - 1) {
                screen_stack_idx++;
                if (current_screen_idx == 0 && selected_item == 2) screen_stack[screen_stack_idx] = 1;
                else if (current_screen_idx == 1 && selected_item == 2) screen_stack[screen_stack_idx] = 2;
                selected_item = 0;
            }
            break;
        case MENU_ACTION_BACK:
            if (screen_stack_idx > 0) {
                screen_stack_idx--;
                selected_item = 0;
            }
            break;
        case MENU_ACTION_TOGGLE:
            if (selected_menu_item->value_ptr != NULL) {
                *(selected_menu_item->value_ptr) = !(*(selected_menu_item->value_ptr));
            }
            break;
        case MENU_ACTION_ACTION_1:
            // Do something (Start System)
            break;
        case MENU_ACTION_ACTION_2:
            // Do something (View Data)
            break;
        default:
            break;
    }
    ui_needs_update = 1;
}
1. menu_handle_up and menu_handle_down (Cursor Navigation)
These two functions are strictly responsible for moving the user’s cursor.
- Screen Lookup: They first determine which screen is currently active by reading the
screen_stackarray. This tells the code how many total items are in the current list. - Boundary Wrapping: When moving up, if the user is already at the top (
selected_item == 0), the code wraps the cursor to the very bottom of the list. When moving down, if they are at the bottom, it wraps back to the top (0). This allows rapid cycling through the menu without dead ends. - Triggering Redraw: After adjusting the
selected_itemindex, the function setsui_needs_update = 1, telling the main loop to redraw the screen with the new highlight position.
2. menu_handle_ok (The Action Dispatcher)
When the OK button is pressed, the code doesn’t just blindly execute code; it looks up the action enum assigned to the currently highlighted MenuItem_t and uses a switch statement to route the behavior.
MENU_ACTION_OPEN_SUBMENU(Navigating Deeper):
To enter a submenu, the code pushes a new screen onto the navigation stack. It incrementsscreen_stack_idxand hardcodes the mapping of which screen to go to next (e.g., if you are on Screen 0 and press OK on item 2, it loads Screen 1). It also resetsselected_itemto0so the cursor starts at the top of the new page.MENU_ACTION_BACK(Navigating Backward):
To go back, the code pops the stack by decrementingscreen_stack_idx. It also resetsselected_itemto0, though a more advanced implementation could remember the previous cursor position.MENU_ACTION_TOGGLE(Dynamic State Flipping):
This is where thevalue_ptrin theMenuItem_tstruct shines. Instead of writing customif/elselogic for every single toggle in your app, the code checks if the pointer is valid, dereferences it, and flips the boolean value (!). Because the rendering engine also reads this pointer, the screen instantly updates to show[ON]or[OFF]without any extra code.- Custom Actions (
ACTION_1,ACTION_2):
These cases are placeholders for executing actual firmware tasks, like starting a motor, reading a sensor, or sending data over UART. - Triggering Redraw:
Regardless of which action was executed, the function concludes by settingui_needs_update = 1. This ensures that if a toggle changed, or a new screen was loaded, the OLED instantly reflects the new state.
Next, in user code begin 2 in main function, render the UI:
render_menu_ui();
Next, in while 1 loop:
static uint32_t last_btn_tick = 0;
uint32_t now = HAL_GetTick();

if (now - last_btn_tick > 200) {

  if (HAL_GPIO_ReadPin(Up_GPIO_Port, Up_Pin) == GPIO_PIN_RESET) {
    menu_handle_up();
    last_btn_tick = now;
  }
  else if (HAL_GPIO_ReadPin(Down_GPIO_Port, Down_Pin) == GPIO_PIN_RESET) {
    menu_handle_down();
    last_btn_tick = now;
  }
  else if (HAL_GPIO_ReadPin(Ok_GPIO_Port, Ok_Pin) == GPIO_PIN_RESET) {
    menu_handle_ok();
    last_btn_tick = now;
  }
}

// 2. State Machine for UI Redraw
// Only draw if a button was pressed
if (ui_needs_update) {
  render_menu_ui();
  ui_needs_update = 0; // Clear the flag
}
This snippet from the main loop handles non-blocking button polling and flicker-free rendering. It uses a 200-millisecond timestamp check to debounce the physical buttons, ensuring a single press doesn’t trigger multiple menu jumps. After processing inputs, it checks the ui_needs_update flag, calling the heavy render_menu_ui function only when a state change actually occurred, and immediately clears the flag to keep the CPU idle and the screen flicker-free.
Thats all for the firmware.
Save the project and run it on your MCU as follows:

You may download the project from here.
4. Results:
You should get this.
Happy coding 😉

Add Comment