In this guide, we shall use registers to change the core frequency from default 16MHz to 100MHz (maximum for F411RE).
We shall use both keil uVision and STM32CubeIDE to change the core frequency to 100MHz.
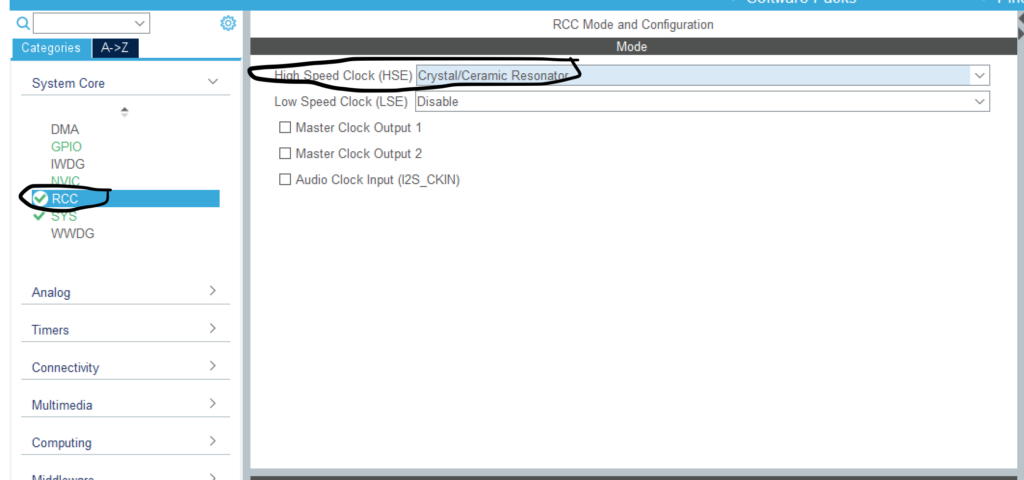
1. Open CubMX
After you select your MCU, head to RCC and select external oscillator
Then open clock configuration and set the external oscillator to one on your board (in my case is 8MHz).
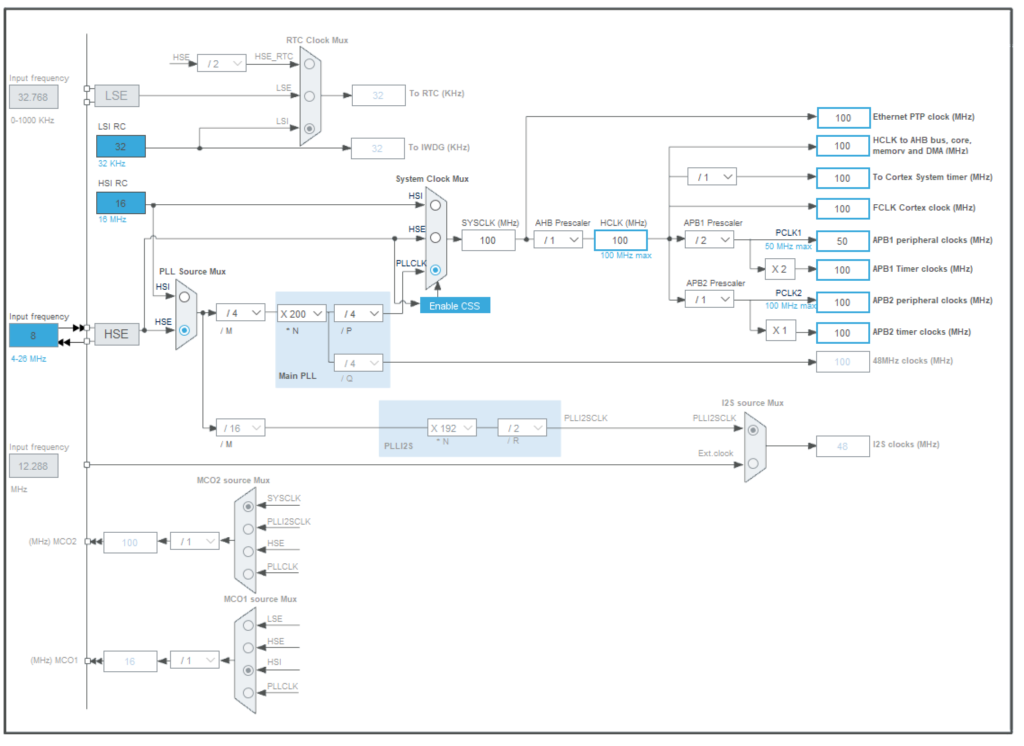
Note the following Values:
- PLL_M
- PLL_N
- PLL_P
- Also, APB1 and APB2 prescalers
In my case they are the following:
#define PLL_M      4
#define PLL_N      200
#define PLL_P      4
2. Start new project
Open either CubeIDE or Keil uVision and start new project
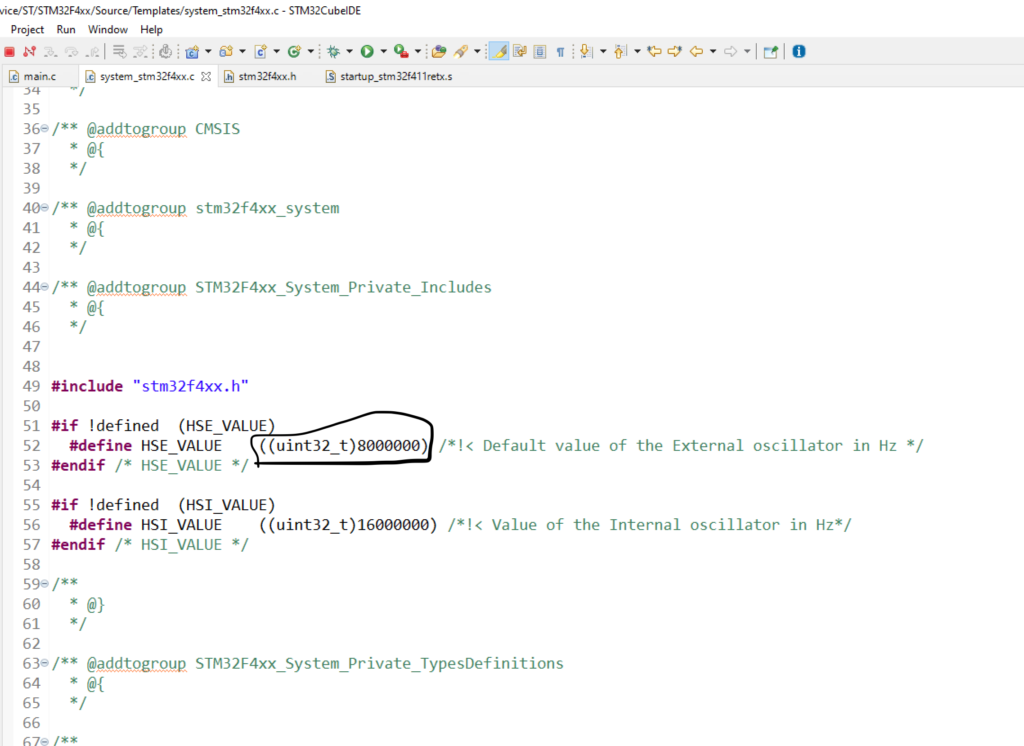
3. Open system_stm32f4xx.c
Open system_stm32f4xx.c file and change the external frequency from 25MHz to one on your board (8MHz in my case).
4. Start the configuration
We start of by enabling external clock and waiting for the external clock to be ready
__IO uint32_t StartUpCounter = 0, HSEStatus = 0;


  RCC->CR |= ((uint32_t)RCC_CR_HSEON);


  do
  {
    HSEStatus = RCC->CR & RCC_CR_HSERDY;
    StartUpCounter++;
  } while((HSEStatus == 0) && (StartUpCounter != 3000));
then if the external clock is enable, proceed to change the core frequency as following
if ((RCC->CR & RCC_CR_HSERDY) != RESET) //HSE enabled
  {
    HSEStatus = (uint32_t)0x01;
  }
  else
  {
    HSEStatus = (uint32_t)0x00;
  }

  if (HSEStatus == (uint32_t)0x01)
  {

    RCC->APB1ENR |= RCC_APB1ENR_PWREN; //enable opwer regultor
    PWR->CR &= (uint32_t)~(PWR_CR_VOS); //reset VOS (mode 3 selected)


    RCC->CFGR |= RCC_CFGR_HPRE_DIV1; //configure AHB1 bus prescaler to 1


    RCC->CFGR |= RCC_CFGR_PPRE2_DIV1; //APB2 prescaler to 1


    RCC->CFGR |= RCC_CFGR_PPRE1_DIV2; //APB2 prescaler to 2


    RCC->PLLCFGR = PLL_M | (PLL_N << 6) | (((PLL_P >> 1) -1) << 16) | //set PLL_M,PLL_N,PLL_P
                   (RCC_PLLCFGR_PLLSRC_HSE) | (PLL_Q << 24);


    RCC->CR |= RCC_CR_PLLON; //turn on the PLL


    while((RCC->CR & RCC_CR_PLLRDY) == 0) //wait untill PLL is active
    {
    }

    /* Configure Flash prefetch, Instruction cache, Data cache and wait state */
    FLASH->ACR = FLASH_ACR_ICEN |FLASH_ACR_DCEN |FLASH_ACR_LATENCY_3WS;

    /* Select the main PLL as system clock source */
    RCC->CFGR &= (uint32_t)((uint32_t)~(RCC_CFGR_SW));
    RCC->CFGR |= RCC_CFGR_SW_PLL;

    /* Wait till the main PLL is used as system clock source */
    while ((RCC->CFGR & (uint32_t)RCC_CFGR_SWS ) != RCC_CFGR_SWS_PLL)
    {;}
  }
  else
  { /* If HSE fails to start-up, the application will have wrong clock
         configuration. User can add here some code to deal with this error */
  }
5. Testing using SysTick delay
We can test the core frequency using SysTick to generate delay as following
void delay(int ms)
{
	SysTick->LOAD=100000-1;
	SysTick->VAL=0;
	SysTick->CTRL=0x5;
		for (int i=0;i<ms;i++)
		{
			while(!(SysTick->CTRL &0x10000)){}
		}
	SysTick->CTRL=0;
}
6. Download source Code
You may download the entire project from here
Keil uVison version
STM32CubeIDE version
Add Comment