This guide demonstrates how to interface a Nokia 5110 display based on the PCD8544 controller with an STM32 microcontroller using the U8G2 graphics library. We will cover hardware setup, library integration, and display initialization to build a solid foundation for graphical applications.
In this guide, we shall cover the following:
- Introduction.
- Connection.
- STM32CubeMX modification.
- Firmware modification.
- Results.
1. Introduction:
The Nokia 5110 LCD is a compact, low-power monochrome graphic display originally used in classic Nokia mobile phones. It features a 48 × 84 pixel resolution and uses the Philips/NXP PCD8544 controller, which provides a simple serial interface for controlling graphics and text. Its small size, reliability, and ease of interfacing make it a popular choice for embedded projects, hobbyists, and educational purposes.
When combined with an STM32F4 microcontroller and the U8g2 graphics library, this display becomes a versatile tool for rendering text, shapes, and simple graphics at high speed. The STM32F4 provides ample processing power and flexible hardware SPI support, while U8g2 offers a full-featured graphics API and supports various fonts, drawing primitives, and buffering modes.
Key advantages of this combination include:
- Ease of use: U8g2 abstracts low-level communication and pixel management, allowing developers to focus on the graphical content.
- High-speed graphics: Hardware SPI on STM32F4 allows fast updates, even when running at higher bus speeds (e.g., 6.25 MHz).
- Low power: The PCD8544 controller is designed for low-power operation, making it suitable for battery-powered applications.
- Flexible drawing: Supports text, lines, boxes, circles, and custom bitmaps via U8g2’s rich API.
This guide demonstrates how to integrate the Nokia 5110 LCD with an STM32F4 board using U8g2, covering initialization, SPI configuration, and graphical operations. By following these steps, you can build responsive, visually rich interfaces for small embedded devices while leveraging the power and flexibility of the STM32 platform.
2. Connection:
The connection as follows:
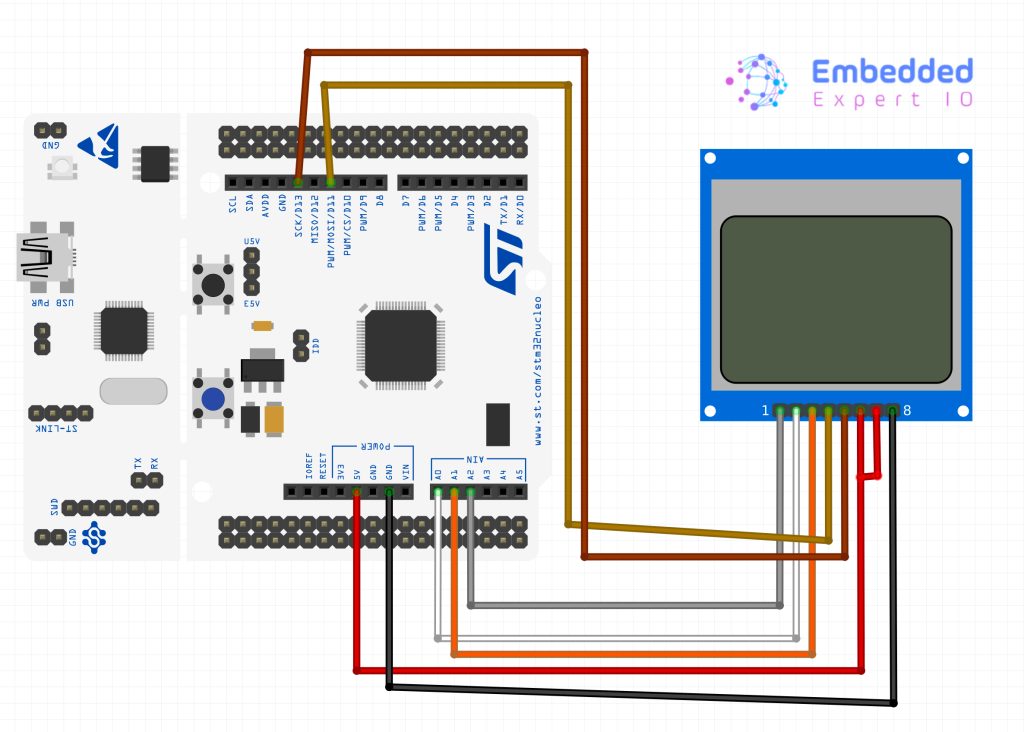
| Nokia 5110 LCD | STM32F411 Nucleo-64 |
| RST | PA4 (A3 of Arduino) |
| CE | PA0 (A0 of Arduino) |
| DC | PA1 (A1 of Arduino) |
| Din | PA7 (D11 of Arduino) |
| CLK | PA5 (D13 of Arduino) |
| Vcc | 5V |
| BL (Back Light) | 5V |
| Gnd | Gnd |
3. STM32CubeMX Modification:
From the previous project, open u8g2.ioc file as follows:
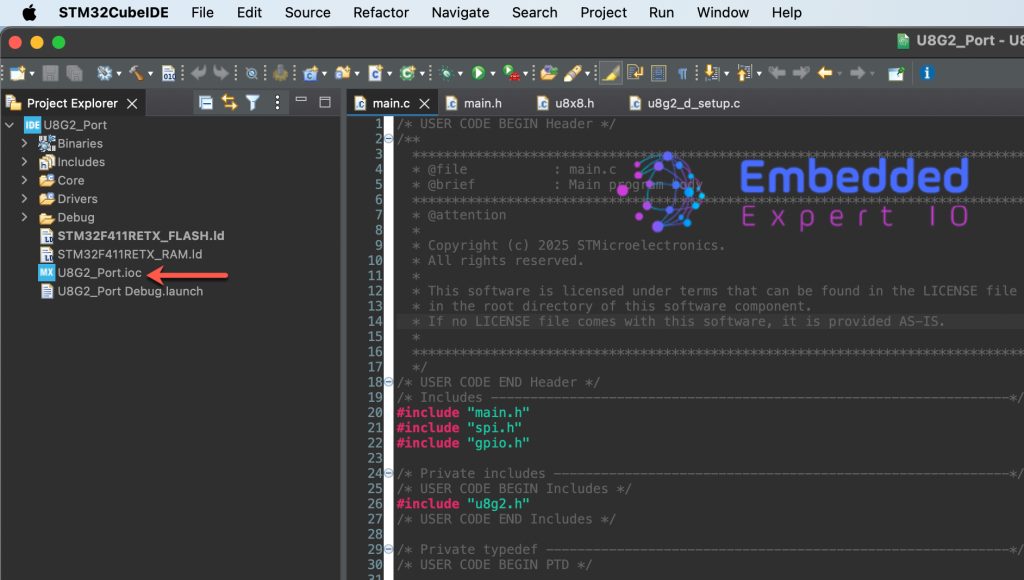
STM32CubeMX window shall appears.
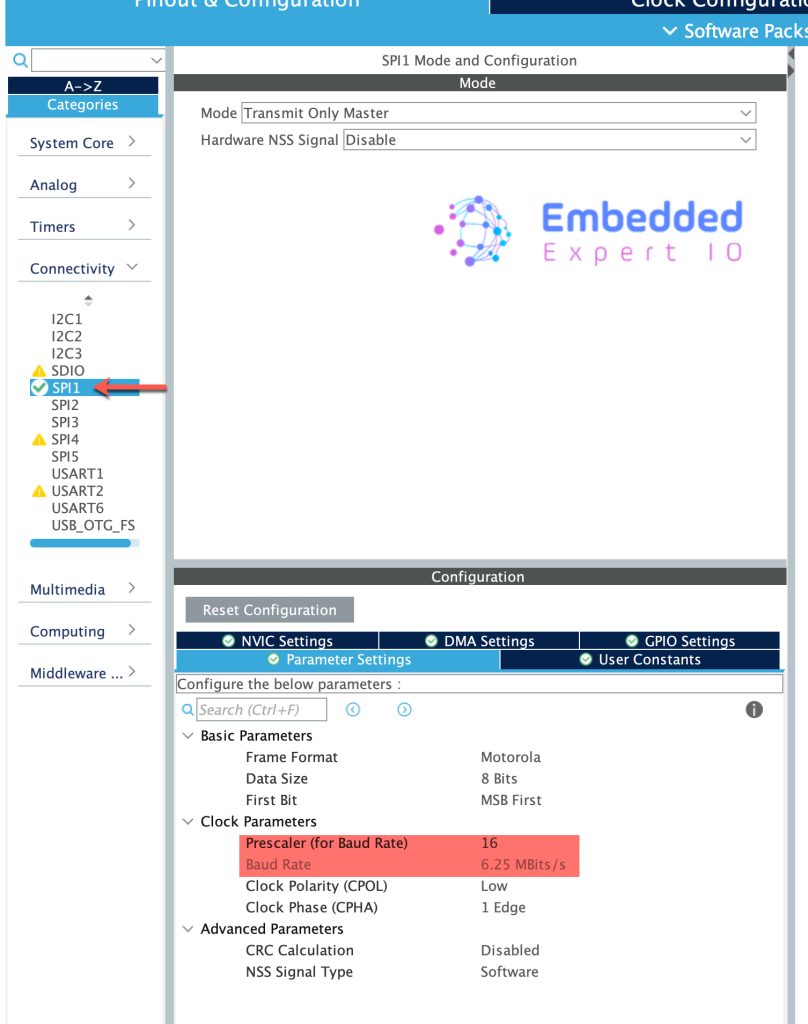
Next, head to SPI1 in connectivity and reduce to baud rate to be around 6.5MBps as follows:
Next, set PA0, PA1 and PA4 as GPIO Output and give them name of CS, DC and RST respectively as follows:
Save the project and this will generate the code.
4. Firmware Modifications:
In uint8_t u8x8_gpio_and_delay function, add the following switch condition:
uint8_t u8x8_gpio_and_delay(u8x8_t *u8x8, uint8_t msg, uint8_t arg_int, void *arg_ptr)
{
	switch(msg)
	{
		case U8X8_MSG_DELAY_MILLI:
			HAL_Delay(arg_int);
			break;
		case U8X8_MSG_GPIO_CS:
			HAL_GPIO_WritePin(CS_GPIO_Port, CS_Pin, arg_int);
			break;
		case U8X8_MSG_GPIO_DC:
			HAL_GPIO_WritePin(DC_GPIO_Port, DC_Pin, arg_int);
			break;
		case U8X8_MSG_GPIO_RESET:
			HAL_GPIO_WritePin(RST_GPIO_Port, RST_Pin, arg_int);
			break;


	}
	return 1;
}
In the user code begin 2 in the main function:
u8g2_Setup_pcd8544_84x48_f(&myDisplay, U8G2_R0, u8x8_spi, u8x8_gpio_and_delay);
Since Nokia 5110 LCD uses PCD8544 driver, we shall use u8g2_Setup_pcd8544_84x48_f function.
Next, initialize the display and wake it up as follows:
u8g2_InitDisplay(&myDisplay); // send init sequence to the display, display is in sleep mode after this,

u8g2_SetPowerSave(&myDisplay, 0); // wake up display
Display string and shape:
  u8g2_ClearDisplay(&myDisplay);
  u8g2_SetFont(&myDisplay, u8g2_font_helvR08_tf);
  u8g2_DrawStr(&myDisplay, 0,15,"Hello world");
  u8g2_DrawCircle(&myDisplay, 60, 30, 10, U8G2_DRAW_ALL);
  u8g2_SendBuffer(&myDisplay);
Thats all for the firmware. Save the project and run it on your MCU as follows:

5. Results:
You should get the following:

Happy coding 😉
Add Comment