In this guide, we shall see how to configure the DMA to transfer data from one memory location to another without using the CPU.
In this guide, we shall cover the following:
- What is DMA.
- Why DMA in Memory to Memory.
- Driver Development.
- Results.
1. What is DMA (Direct Memory Access)?
Before explaining about DMA, we will see one real-life example. Assume that you are a husband, and you have one wife, and one child in your family. In your child’s school, there is a parent-teacher meeting scheduled. But if you go to that meeting, you have to spend the whole day In school, which will affect your other work. But you need to do that other work also. There is no excuse. So, what you can do? You can ask your wife to go to school and you can concentrate on your work. So, your intervention is not required on that day. Your wife will take care of that parent-teacher meeting. So, there are two things. One is you can concentrate on the other work, and the second is that parent-teacher meetings also happen on time.
I know this example might not be a great one. You might have many questions in this example like why should only women go to school? Can’t women have other work? Nothing is more important than the parent-teacher meeting. I am sorry for that, and this is just an example.
Now we will go to DMA. DMA stands for Direct Memory Access. The name itself is self-explanatory. Using DMA we can access the memory directly without CPU intervention. In other words, it transfers data between different devices or memory regions without involving the CPU.
2. Why DMA in Memory to Memory Mode:
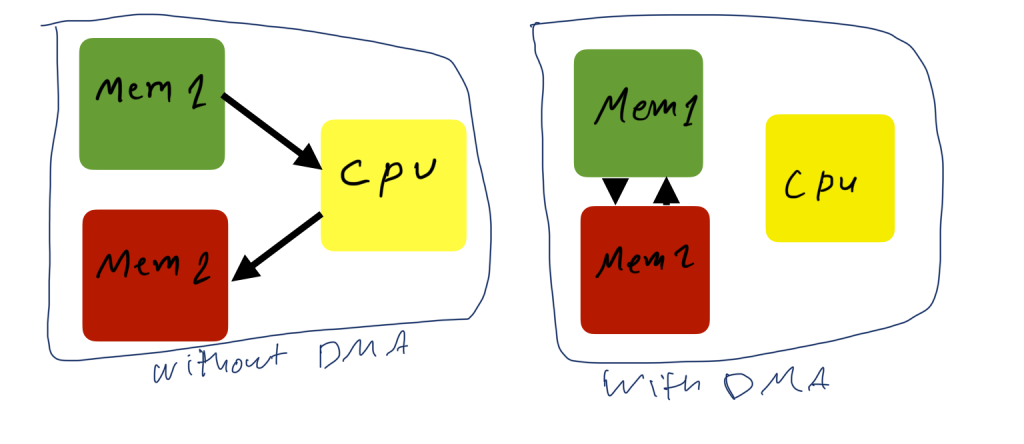
Check the image bellow. In that, we have two memories called memory 1 and memory 2. If we don’t have the DMA, then the read-write from/to memories needs the CPU’s help. So, the time taken for that process will be more, and also CPU is occupied for this operation. If we have DMA, then the DMA controller will take care of that process and the CPU can do the other process. So, the memory can be accessed without the CPU involvement, and this process takes less time.
Feel Free to diver even deeper in the DMA section from the reference manual of STM32G070.
3. Driver Development:
We start off by creating new project with name of DMA_M2M. For more details how to create new project on STM32CubeIDE, please refer to this guide.
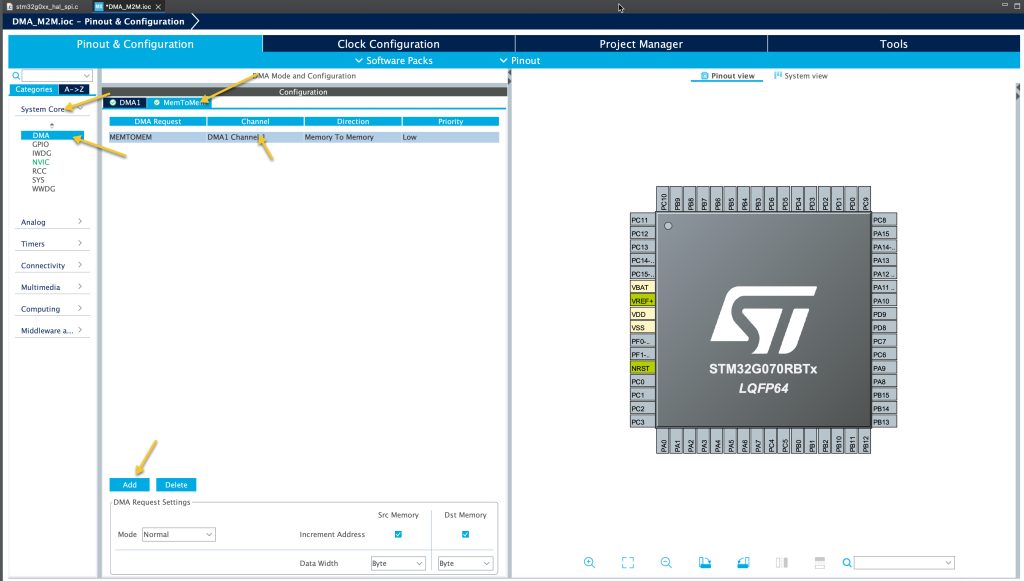
From System Core:
- Select DMA.
- Open MemToMem tab.
- Click on Add.
- Select MEMTOMEM.
- Leave everything to their default values.
- Save the project and this shall generate the code.
In main.c, within User Code begin PV:
Declare the following define:
#define data_size 100
This shall hold the data size to transferred.
Declare two arrays to hold the two memory locations:
uint8_t TxBuffer[data_size];
uint8_t RxBuffer[data_size];
Since the DMA is set to transfer byte, we declare the buffers as uint8_t which is unsigned byte.
Declare a counter to change the variable over time:
uint8_t counter;
Since the counter is 8-bit, it will reach 255 and then get back to zero.
In user code begin 3,
Fill the array with incremented counter value as following:
	  for (int i=0;i<data_size;i++)
	  {
		  TxBuffer[i]=counter++;
	  }
Start the DMA transfer:
HAL_DMA_Start(&hdma_memtomem_dma1_channel1, (uint32_t)TxBuffer, (uint32_t)RxBuffer, data_size);
The function HAL_DMA_Start takes the following:
- hdma Pointer to a DMA_HandleTypeDef structure that contains the configuration information for the specified DMA Channel.
- SrcAddress The source memory Buffer address.
- DstAddress The destination memory Buffer address
- ataLength The length of data to be transferred from source to destination
The function also returns:
- HAL status.
Wait for the transfer to be completed:
while(HAL_DMA_PollForTransfer(&hdma_memtomem_dma1_channel1, HAL_DMA_FULL_TRANSFER, 100) != HAL_OK)
The function HAL_DMA_PollForTransfer takes the following parameters:
- Pointer to a DMA_HandleTypeDef structure that contains the configuration information for the specified DMA Channel.
- CompleteLevel Specifies the DMA level complete.
- Timeout duration.
Also, the function shall return the following:
- HAL status.
Thats all for the driver development.
4. Results:
Build your project and start a debug session then add RxBuffer to live expressions and you should get the following:

We have successfully transferred 100 bytes of data using DMA without using the CPU.
Happy coding 😉
Add Comment