Character display LCD ares used in so many products we used daily. We can find them in Espresso machines, 3D printers, microwaves and printers and many other products. In this lesson we going to lean how to interface LCD’s to our cortex- microcontroller board. This lessons covers just character display LCD’s there is another lesson covering graphics display LCDs. Th most popular LCD controller currently on the market is the Hitachi HD44780, some other well-known ones include the Tinssharp/Eon 1602A. The content of this lesson applies to all LCD controllers. Where there is a little difference, it shall be indicated.
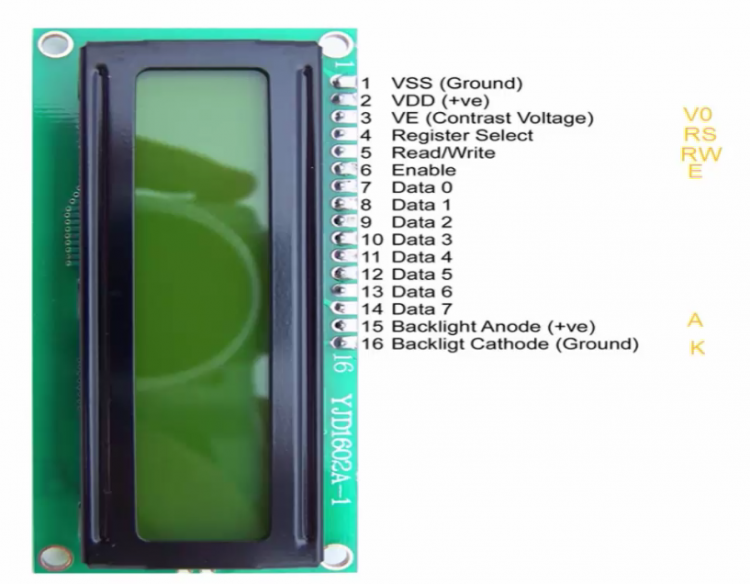
LCD Pinout
Things to know
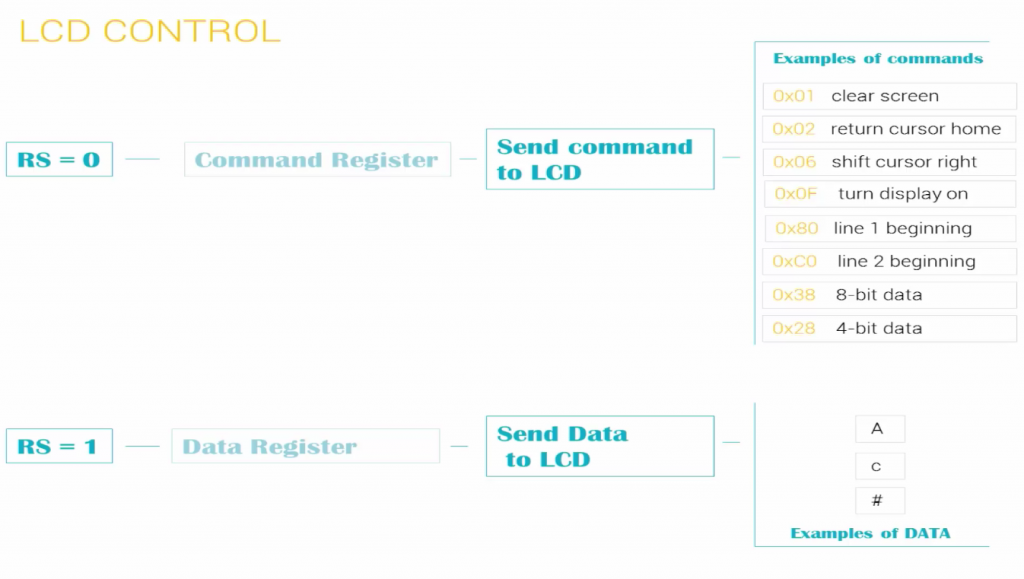
- LCD has two internal registers; instruction register and data register
- RS pin is used for selecting these register-
-RS = 0 : instruction command code select
-RS = 1 : data command code select
-RS =0 allows us to send commands such as clear screen, move cursor etc.
-RS= 1 allows us to send data to be displayed or retrieve displayed data .
- R/W : Allows reading and writing information to LCD
-R/W = 1 : reading
-R/W = 0 : writing
- E : E is known as the enable pin. It us used by the LCD to secure information.
– When data is supplied to the data pins a High-Low pulse must be applied
to the E pin in order to secure the data. Minimum width of pulse should be
230ns for the Hitachi and 140ns for the Tinsharp.
- D0-D7 : These are known as the 8-bits data pins. They are used to transfer information to and from the LCDs
LCD Pin Groupings
Programming the LCD
Sending Commnd
- Set RS =0 to select command register
- Send a High-Low pulse to E to secure command
Sending Data
- Set RS=1 to select data register
- Send a High-Low pulse to E to secure data
Two example source codes are presented in this lesson. The first program shows how to interface the LCD with 8-bits data line and the second example show how to interface the LCD with only 4-bits data line. There are also some function for processing characters into strings and performing other auxiliary tasks. Please leave a comment if you have any questions .
Program 1 : LCD 8-bits
#include "TM4C123.h" // Device header
void delay_milli(int n);
void delay_micro(int n);
void LCD_init(void);
void LCD_Cmd(unsigned char command);
void LCD_Data(unsigned char data);
int main(){
LCD_init();
// while(1)
// {
LCD_Cmd(0x01);
LCD_Cmd(0x80);
delay_milli(500);
LCD_Data('C');
delay_milli(1);
LCD_Data('O');
delay_milli(1);
LCD_Data('R');
delay_milli(1);
LCD_Data('T');
delay_milli(1);
LCD_Data('E');
delay_milli(1);
LCD_Data('X');
delay_milli(1);
LCD_Data('-');
delay_milli(1);
LCD_Data('M');
delay_milli(1);
LCD_Data('.');
delay_milli(1);
LCD_Data('C');
delay_milli(1);
LCD_Data('O');
delay_milli(1);
LCD_Data('M');
delay_milli(500);
//}
}
void LCD_init(void){
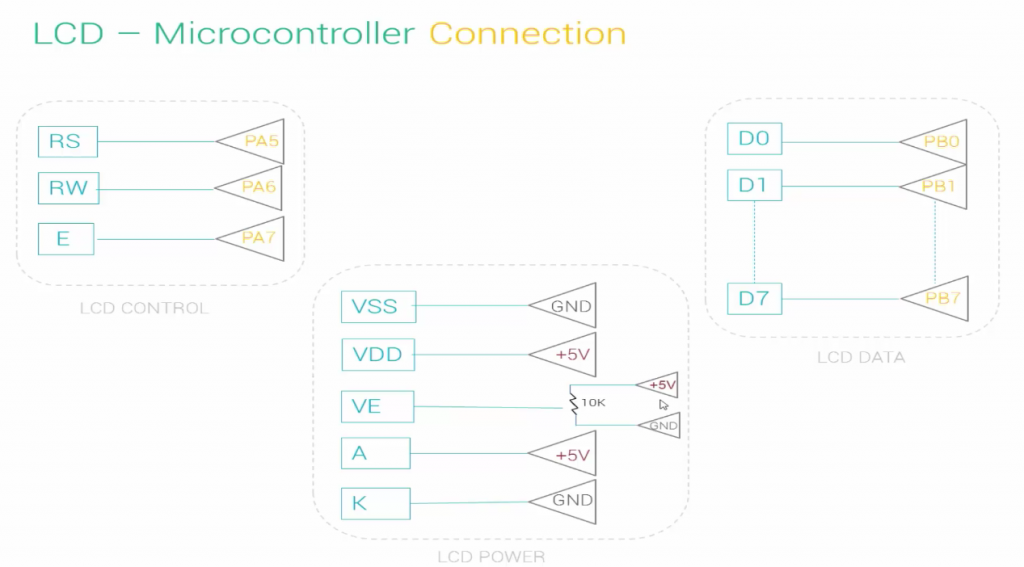
SYSCTL->RCGCGPIO |= 0x01; //PORTA clock
SYSCTL->RCGCGPIO |= 0x02;
GPIOA->DIR |=0xE0; //PORTA controls RS,E and R/W
GPIOA->DEN |=0xE0;
GPIOB->DIR |=0xFF; //PORTB D0-D7
GPIOB->DEN |=0xFF; //PORTB D0-D7
LCD_Cmd(0x38); //8-bits,2 display lines, 5x7 font
LCD_Cmd(0x06); //increments automatically
LCD_Cmd(0x0F); //Turn on display
LCD_Cmd(0x01); //clear display
}
void LCD_Cmd(unsigned char command)
{
GPIOA->DATA = 0x00; //RS =0, E=0, RW=0
GPIOB->DATA =command;
GPIOA->DATA =0x80; //E=1 to secure command
delay_micro(0);
GPIOA ->DATA =0x00;
if(command <4) delay_milli(2); else delay_micro(37); } void LCD_Data(unsigned char data) { GPIOA ->DATA =0x20; //RS=1, E=0,RW=0
GPIOB->DATA =data;
GPIOA->DATA |= 0x80;
GPIOA->DATA =0x00;
delay_micro(0);
}
void delay_milli(int n){
int i,j;
for(i=0;i<n;i++)
for(j=0;j<3180;j++)
{}
}
void delay_micro(int n){
int i,j;
for(i=0;i<n;i++)
for(j=0;j<3;j++)
{}
}Program 2 : LCD 4-bits
#include "TM4C123.h" // Device header

#define LCD_CTRLP GPIOA
#define LCD_DATAP GPIOB
#define RS 0x20 /* PORTA BIT5 mask */
#define RW 0x40 /* PORTA BIT6 mask */
#define EN 0x80 /* PORTA BIT7 mask */
#define HIGH 1
#define LOW 0

void delay_milli(int n);
void delay_micro(int n);
void LCD_init(void);
void LCD4bit_Cmd(unsigned char command);
void LCD4bit_Data(unsigned char data);

int main()
{
 LCD_init();
 LCD4bit_Cmd(0x01);
 LCD4bit_Cmd(0x80);
 delay_milli(500);

 LCD4bit_Data('a');
 delay_micro(20);
// LCD4bit_Data('E');
 delay_milli(500);
//

}

void LCD_init(void)
{
 SYSCTL->RCGCGPIO |=0x01;
 SYSCTL->RCGCGPIO |=0x02;
 LCD_DATAP ->DIR |=0xF0;
 LCD_DATAP ->DEN |=0xF0;
 LCD_CTRLP ->DIR |=0xF0;
 LCD_CTRLP ->DEN |=0xF0;

 LCD4bit_Cmd(0x20);
 LCD4bit_Cmd(0x28);
 LCD4bit_Cmd(0x06);
 LCD4bit_Cmd(0x01);
 LCD4bit_Cmd(0x0F);

 //..
 //...
}
void LCD4bit_Data(unsigned char data)
{
 unsigned char temp;
 LCD_CTRLP->DATA = RS;
 temp = data;
 temp = temp>>4;
 LCD_DATAP->DATA = temp;
 LCD_CTRLP->DATA = RS |EN;
 delay_micro(10);
 LCD_CTRLP->DATA =RS;
 delay_micro(37);

 temp =data;
 //LCD_CTRLP->DATA = RS;
 LCD_DATAP->DATA = temp;
 LCD_DATAP->DATA = RS |EN;
 delay_micro(10);
 LCD_CTRLP->DATA =0x00;
 delay_micro(37);

}

void LCD4bit_Cmd(unsigned char command)
{
 unsigned char temp;
 LCD_CTRLP->DATA = 0x00;
 temp = command;
 temp = temp>>4;
 LCD_DATAP->DATA =temp;
 LCD_CTRLP->DATA = EN;
 delay_micro(0);
 LCD_CTRLP->DATA = 0x00;
 if(command < 4) delay_milli(2); else delay_micro(37); temp = command; LCD_DATAP->DATA =temp;
 LCD_CTRLP->DATA = EN;
 delay_micro(0);
 LCD_CTRLP->DATA =0x00;

}

void delay_milli(int n)
{
 int i,j;
 for(i=0;i<n;i++)
 for(j=0;j<3180;j++)
 {}
}

void delay_micro(int n)
{
 int i,j;
 for(i=0;i<n;i++)
 for(j=0;j<3;j++)
 {}

}
Add Comment