
In this guide, we shall discuss how implement timeout for peripheral driver in polling mode.
In this guide, we shall cover the following:
- Implementing time out.
- Example on I2C.
1. Implementing Time Out:
In order to implement timeout in your firmware, you need timer. Since STM32 is based on ARM, SysTick will be used to handle time out and delay function which available across all ARM Cortex M devices.
Open your project and create new source and header file with name of Time_Out.c and Time_Out.h respectively.
Within the header file, include stdint as following:
#include "stdint.h"
Declare the following enum for OK and ERROR and call it TypedefStatus:
typedef enum
{

	OK=0,
	Error=1

}TypdedefStatus;
Add the following functions:
void Ticks_Init(uint32_t freq);

uint32_t get_Ticks();

void delay(uint32_t delay_ms);
Hence, the entire header file as following:
#ifndef TIMEOUT_H_
#define TIMEOUT_H_

#include "stdint.h"

typedef enum
{

	OK=0,
	Error=1

}TypdedefStatus;

void Ticks_Init(uint32_t freq);

uint32_t get_Ticks();

void delay(uint32_t delay_ms);


#endif /* TIMEOUT_H_ */
Now, head for the source file and include the Time_Out.h header as following:
#include "TimeOut.h"
Include the header file for STM32Fxxx (F4 in this example):
#include "stm32f4xx.h"
Declare the following variable to handle timing:
volatile uint32_t current_ticks;
We start off by Ticks_init:
The init function takes one argument which is the core frequency:
void Ticks_Init(uint32_t freq)
Within the function, we shall load the value of the freq/1000 -1 to generate 1ms period as following:

	/*Load the SysTick value to be the core frequency over 1000
	 *
	 * Since th core frequency is in MHz, dividing it by 1000 will get 1ms period
	 * */
	SysTick->LOAD=(freq/1000)-1;
We shall configure the Systick with the following parameters:
- Clock source to be processor clock.
- Enable Systick interrupt.
- Enable the counter.
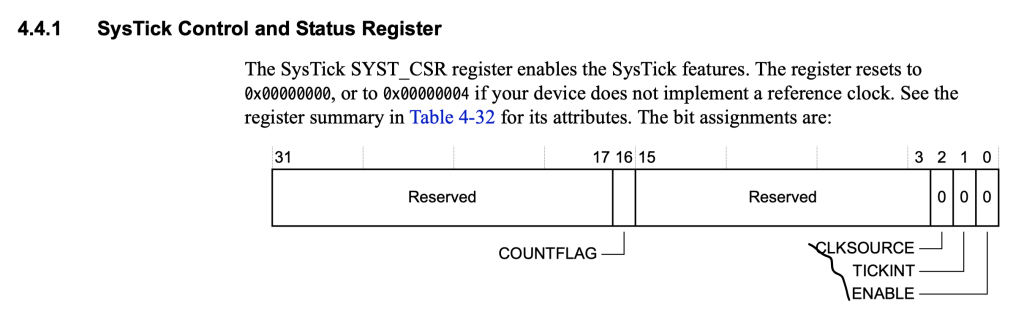
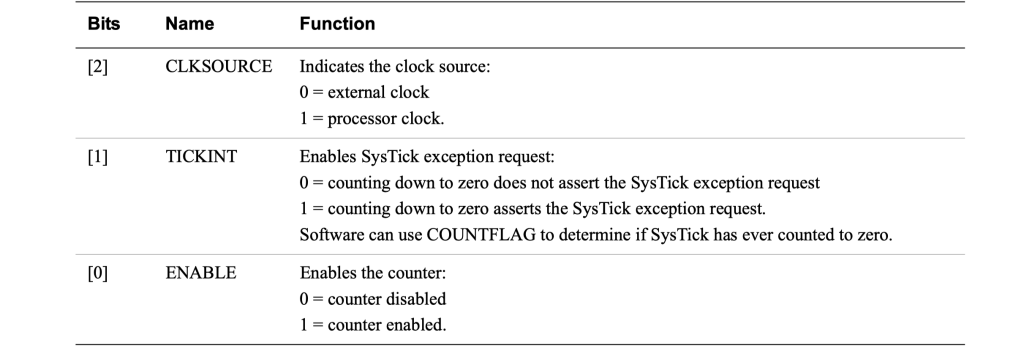
	/*Set the source to be internal core clock*/
	SysTick->CTRL=(1<<SysTick_CTRL_CLKSOURCE_Pos);

	/*Enable The interrupt */

	SysTick->CTRL|=(1<<SysTick_CTRL_TICKINT_Pos);

	/*Enable Systick Interrupt in NIVC*/

	NVIC_EnableIRQ(SysTick_IRQn);

	/*Enable Systick*/
	SysTick->CTRL|=(1<<SysTick_CTRL_ENABLE_Pos);
Thats all for the initializing function.
For the interrupt handler:
void SysTick_Handler()
{
	/*Increment the counter*/
	current_ticks++;
}
Also, we need to get the current ticks as following:
uint32_t get_Ticks()
{
	/*Return the counter value*/
	return current_ticks;
}
Spin lock the CPU for delay:
/*Spin lock the CPU to force delay*/
void delay(uint32_t delay_ms)
{

	uint32_t ticks_start=get_Ticks();

	while(get_Ticks()-ticks_start<delay_ms);
}
Hence, the source file as following :
#include "stm32f4xx.h"

#include "TimeOut.h"


volatile uint32_t current_ticks;


void Ticks_Init(uint32_t freq)
{
	/*Load the SysTick value to be the core frequency over 1000
	 *
	 * Since th core frequency is in MHz, dividing it by 1000 will get 1ms period
	 * */
	SysTick->LOAD=(freq/1000)-1;

	/*Set the source to be internal core clock*/
	SysTick->CTRL=(1<<SysTick_CTRL_CLKSOURCE_Pos);

	/*Enable The interrupt */

	SysTick->CTRL|=(1<<SysTick_CTRL_TICKINT_Msk);

	/*Enable Systick Interrupt in NIVC*/

	NVIC_EnableIRQ(SysTick_IRQn);

	/*Enable Systick*/
	SysTick->CTRL|=(1<<SysTick_CTRL_ENABLE_Pos);


}

void SysTick_Handler()
{
	/*Increment the counter*/
	current_ticks++;
}

uint32_t get_Ticks()
{
	/*Return the counter value*/
	return current_ticks;
}

/*Spin lock the CPU to force delay*/
void delay(uint32_t delay_ms)
{

	uint32_t ticks_start=get_Ticks();

	while(get_Ticks()-ticks_start<delay_ms);
}
2. Example on I2C Driver:
The idea to use I2C is the driver requires ton of while loop as seen in this guide from here.
The new declaration for the function as following:
TypdedefStatus i2c_readByte(char saddr,char maddr, char *data, uint32_t timeout)
The function returns TypedefStatus and takes 4 arguments as following:
- Slave address.
- Memory address.
- Pointer to the data to read.
- timeout for timeout handling.
Within the function, we start off by declaring Tick_start with initial value of current ticks:
uint32_t Tick_start=get_Ticks();
Now, within each while loop, check if timeout occurs as following:
	while(I2C1->SR2&I2C_SR2_BUSY)
	{
		if(get_Ticks() - Tick_start > timeout) {return ERROR;}
	}

	I2C1->CR1|=I2C_CR1_START;

	while(!(I2C1->SR1&I2C_SR1_SB))
	{
		if(get_Ticks() - Tick_start > timeout) {return ERROR;}
	}

	I2C1->DR=saddr<<1;

	while(!(I2C1->SR1&I2C_SR1_ADDR))
	{
		if(get_Ticks() - Tick_start > timeout) {return ERROR;}
	}

	(void)I2C1->SR2;

	while(!(I2C1->SR1&I2C_SR1_TXE))
	{
		if(get_Ticks() - Tick_start > timeout) {return ERROR;}
	}

	I2C1->DR=maddr;

	while(!(I2C1->SR1&I2C_SR1_TXE))
	{
		if(get_Ticks() - Tick_start > timeout) {return ERROR;}
	}

	I2C1->CR1|=I2C_CR1_START;

	while(!(I2C1->SR1&I2C_SR1_SB))
	{
		if(get_Ticks() - Tick_start > timeout) {return ERROR;}
	}

	I2C1->DR=saddr<<1|1;

	while(!(I2C1->SR1&I2C_SR1_ADDR))
	{
		if(get_Ticks() - Tick_start > timeout) {return ERROR;}
	}

	I2C1->CR1&=~I2C_CR1_ACK;

	(void)I2C1->SR2;

	I2C1->CR1|=I2C_CR1_STOP;

	while(!(I2C1->SR1&I2C_SR1_RXNE))
	{
		if(get_Ticks() - Tick_start > timeout) {return ERROR;}
	}

	*data++=I2C1->DR;

	return OK;
Now, the I2C read byte function won’t spin lock the cpu for ever in case something went wrong and will return error which can be handled within your application.
Happy coding 🙂
Add Comment