Achieve the absolute pinnacle of microcontroller efficiency by offloading the entire UART communication workload from the CPU to the Direct Memory Access (DMA) controller. This guide details how to configure an independent DMA stream using Low Layer (LL) drivers to automatically transfer whole data buffers directly from RAM to the UART peripheral registers without fetching a single instruction or triggering a single CPU interrupt during the transmission.
In this guide, we shall cover the following:
- Introduction.
- STM32CubeMX setup.
- Firmware Development.
- Results.
1. Introduction:
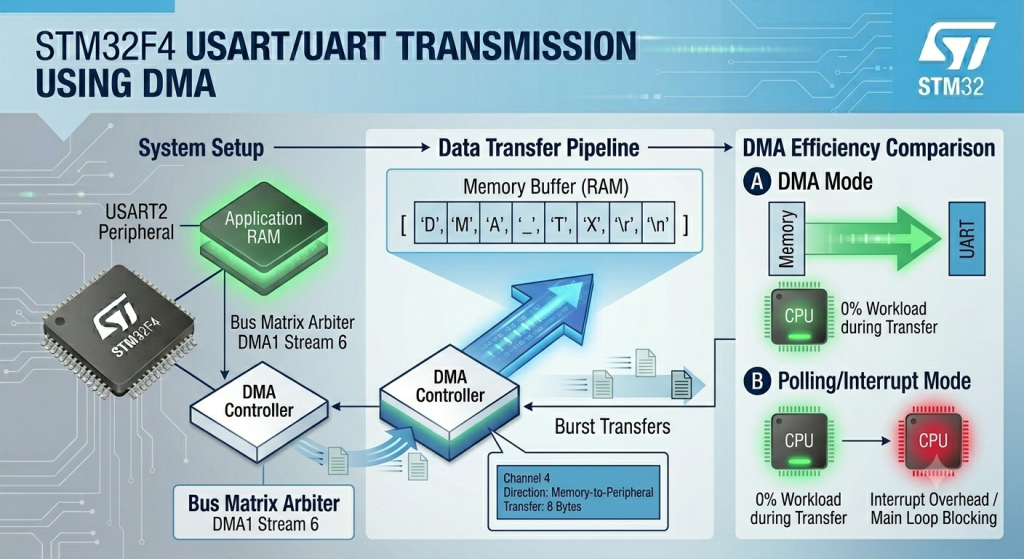
While shifting from polling to interrupt-driven UART transmission drastically reduces CPU stalling, high-speed communication lines can still present a hidden tax on system performance. At elevated baud rates or dense data streams, an interrupt-driven system forces the CPU to constantly pause its main execution thread, save its context to the stack, execute the Interrupt Service Routine (ISR) for a single byte, and restore its context. This context-switching overhead can bottleneck complex calculation routines or real-time control loops.
The Direct Memory Access (DMA) controller provides a hardware-level solution to this problem. It acts as a secondary, specialized processor core whose sole responsibility is moving data directly across the microcontroller’s internal bus matrix.
By configuring a dedicated DMA stream (such as DMA1, Stream 6, Channel 4 for USART2 TX on the STM32F4), you establish an autonomous pipeline between your application RAM buffer and the UART peripheral. When a transmission is initiated, the CPU simply hands the starting memory address and the total data length to the DMA controller, then immediately walks away to perform other tasks.
The DMA controller takes over the internal bus, pulling bytes from RAM and dropping them into the UART Transmit Data Register (TDR) at the exact rate dictated by the hardware flag, operating completely in the background. The CPU remains 0% utilized during the entire transfer process, receiving a single, clean interrupt only when the complete block of data has cleared memory.
Key Structural Differences: Interrupt Mode vs. DMA Mode
The table below breaks down how these two background processing techniques differ across critical architectural metrics:
| Operational Metric | Interrupt-Driven Mode | Direct Memory Access (DMA) Mode |
|---|---|---|
| CPU Workload During Transfer | Medium: The CPU must halt and execute an ISR for every individual byte in the buffer. | Zero: The DMA hardware manages the entire buffer transfer; the CPU is completely free. |
| Context-Switching Overhead | High: Constantly pushes and pops CPU registers to/from the stack for every byte character. | None: Data bypasses the CPU core entirely via the internal bus arbiter. |
| Interrupt Frequency | High: Triggers N interrupts for a buffer of Nbytes. | Very Low: Triggers exactly one interrupt per buffer (Transfer Complete – TC). |
| Maximum Data Throughput | Limited by the speed at which the CPU can enter and exit the UART ISR safely. | Limited only by the physical baud rate and internal bus matrix arbitration. |
| Configuration Complexity | Moderate: Requires writing an ISR to handle TXE and TC flags step-by-step. | High: Requires setting up memory/peripheral addresses, data direction, increments, and streams. |
| Ideal Use Case | Sporadic communication, short command strings, or lower baud rates (e.g., debugging). | Bulk data streaming, high-speed sensor arrays, audio processing, or display updates. |
2. STM32CubeMX setup:
We shall continue from the previous guide from here.
Open the .ioc file in STM32CubeMX.
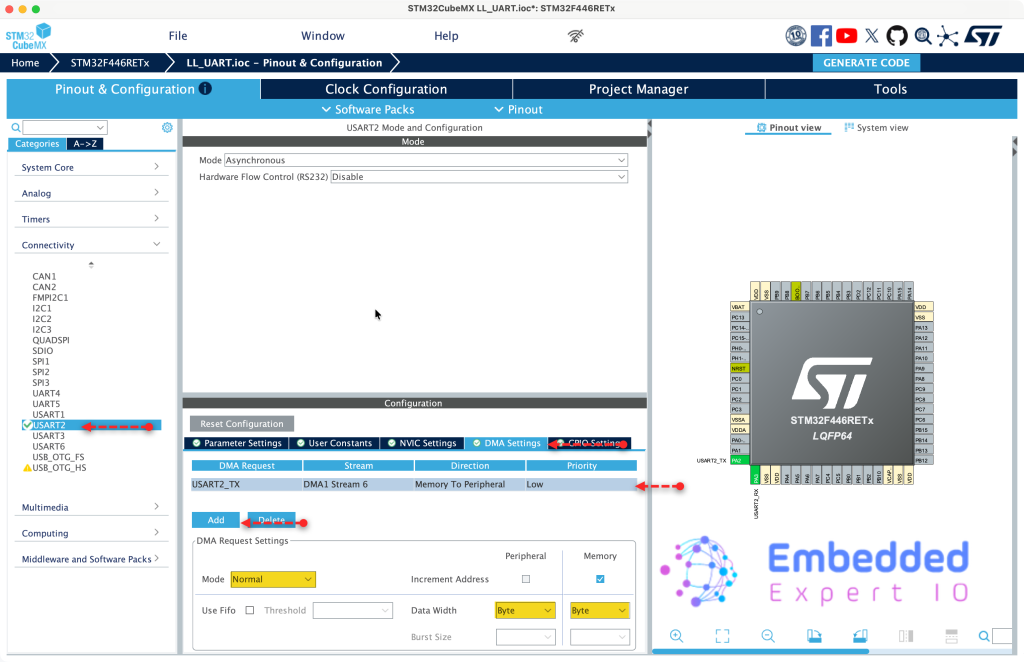
From the Connectivity, select USART2, DMA setting tab and configure the DMA as follows after clicking on add:
- Mode to normal.
- Data width for byte for both peripheral and memory
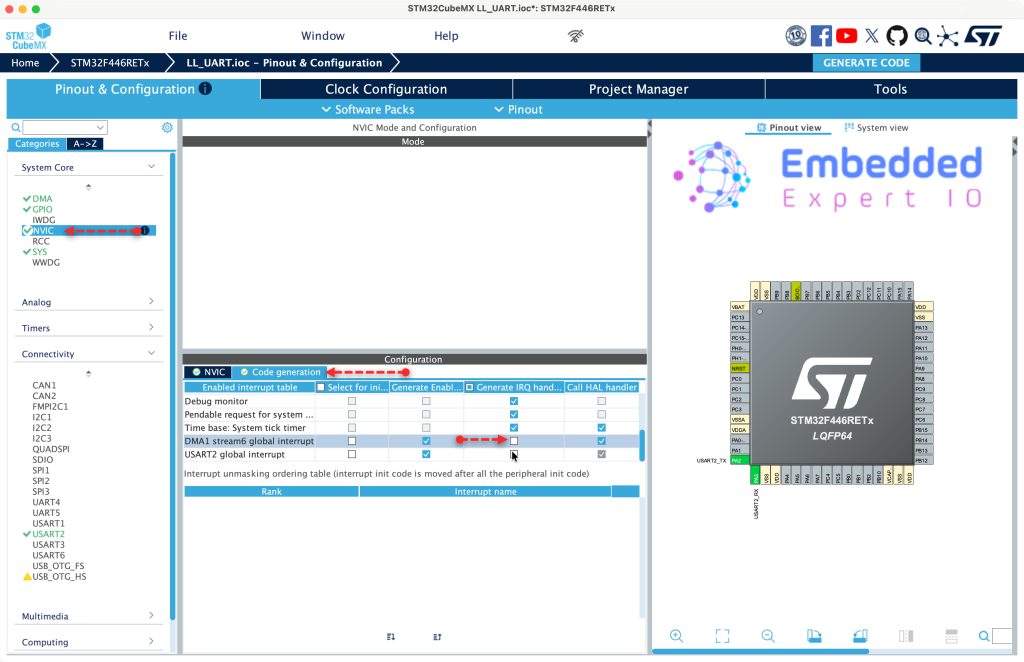
Next, from system core NVIC, code generation, disable code generation for the DMA IRQ handler as follows
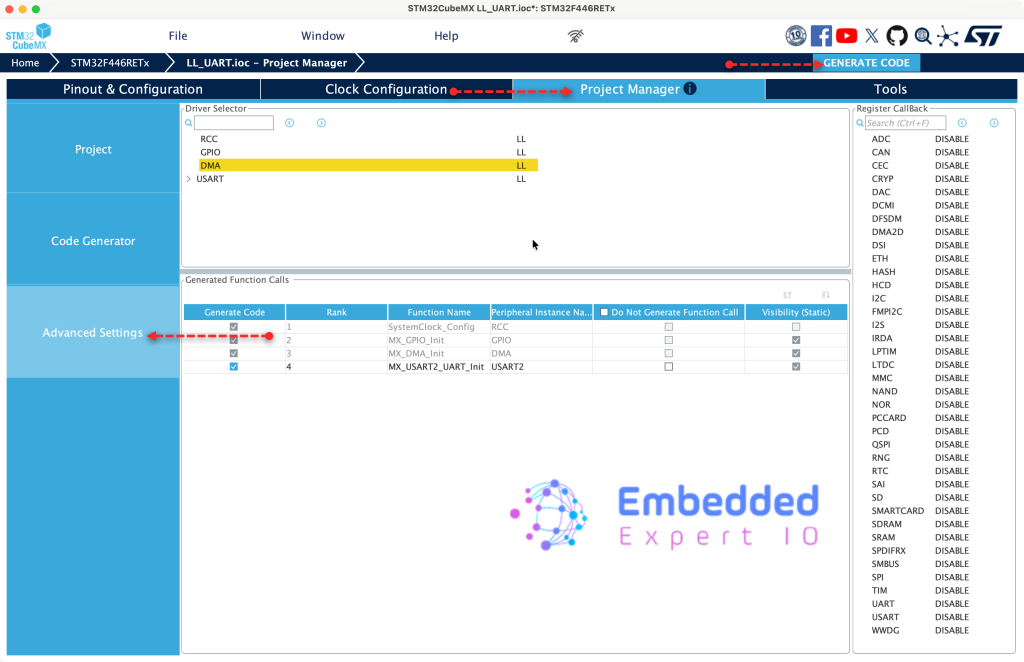
After that, from Project Manager tab, Advanced Settings, set DMA to use LL as follows and click on Generate Code.
Thats all for STM32CubeMX configuration.
3. Firmware Development:
Open the project in STM32CubeIDE and open main.c of the project.
We start by declaring the following function:
void UART_Send_DMA(uint8_t * ch, uint16_t len)
This function shall send the data over uart using DMA. The function shall take the following two parameters:
- Pointer to the array that holds the characters to be sent.
- length of the array.
Within the function, we start by clearing the flag as follows:
Tx_Done = 0;
Next, disable the DMA stream as follows:
LL_DMA_DisableStream(DMA1, LL_DMA_STREAM_6);
Set the peripheral address as follows:
LL_DMA_SetPeriphAddress(DMA1, LL_DMA_STREAM_6, LL_USART_DMA_GetRegAddr(USART2));
Set the memory address:
LL_DMA_SetMemoryAddress(DMA1, LL_DMA_STREAM_6, (uint32_t)ch);
Set the data length:
LL_DMA_SetDataLength(DMA1, LL_DMA_STREAM_6, len);
Clear transfer completed interrupt flag and enable transfer complete interrupt as follows for UART:
LL_USART_ClearFlag_TC(USART2);
LL_USART_EnableIT_TC(USART2);
Enable the DMA request for uart as follows:
LL_USART_EnableDMAReq_TX(USART2);
Clear transfer complete interrupt flag and enable transfer completed interrupt interrupt for DMA as follows:
LL_DMA_EnableIT_TC(DMA1, LL_DMA_STREAM_6);
LL_DMA_EnableStream(DMA1, LL_DMA_STREAM_6);
Next, for DMA interrupt handler:
void DMA1_Stream6_IRQHandler(void)
{
    if (LL_DMA_IsActiveFlag_TC6(DMA1))
    {
        LL_DMA_ClearFlag_TC6(DMA1);
        LL_DMA_DisableStream(DMA1, LL_DMA_STREAM_6);


    }
}- Check if the source is Stream 6 from DMA1, if it is.
- Clear the TC flag.
- Disable the stream.
We shall use TC of the UART to determine the end of the transfer rather than DMA since it will generate an interrupt once the last character has been transmitted.
In use code begin 3 in while 1 loop:
buff_len=sprintf(uart_buff,"Counter Value =%d \r\n",counter++);

UART_Send_DMA((uint8_t *)uart_buff,buff_len);

while(Tx_Done==0);

Tx_Done=0;

LL_mDelay(100);
Thats all for the firmware.
Save, build and run the project as follows:

4. Results:
Open your favourite terminal application, set the baudrate to 115200 and you should get the following:
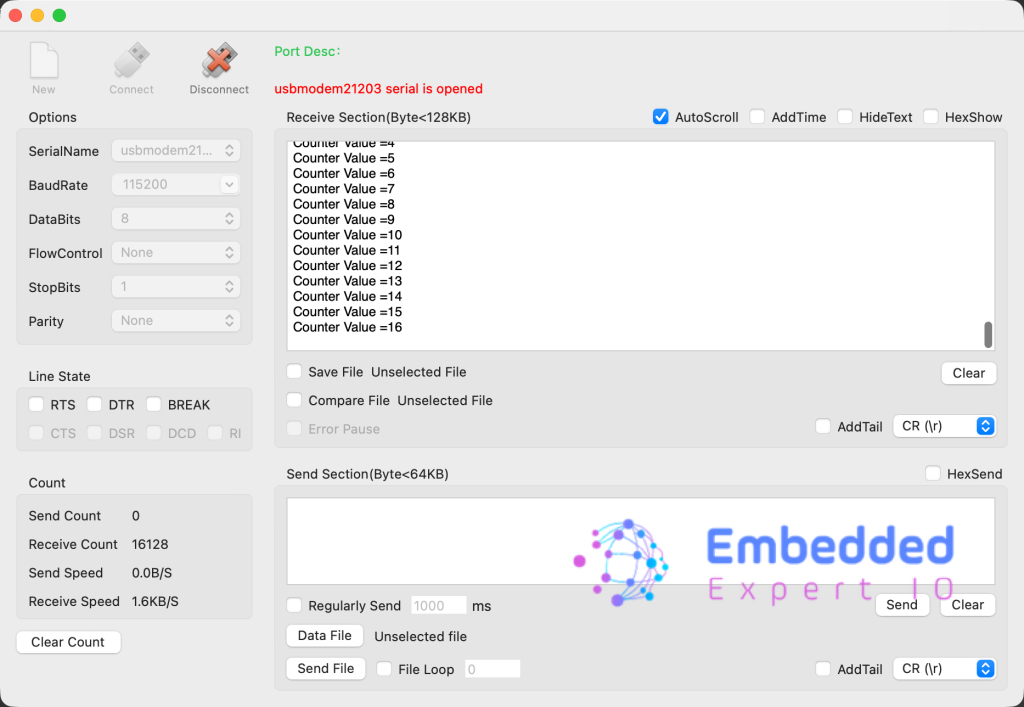
Congratulations, you send the string successfully using interrupt.
You may download the project from here.
Happy coding 😉
Add Comment