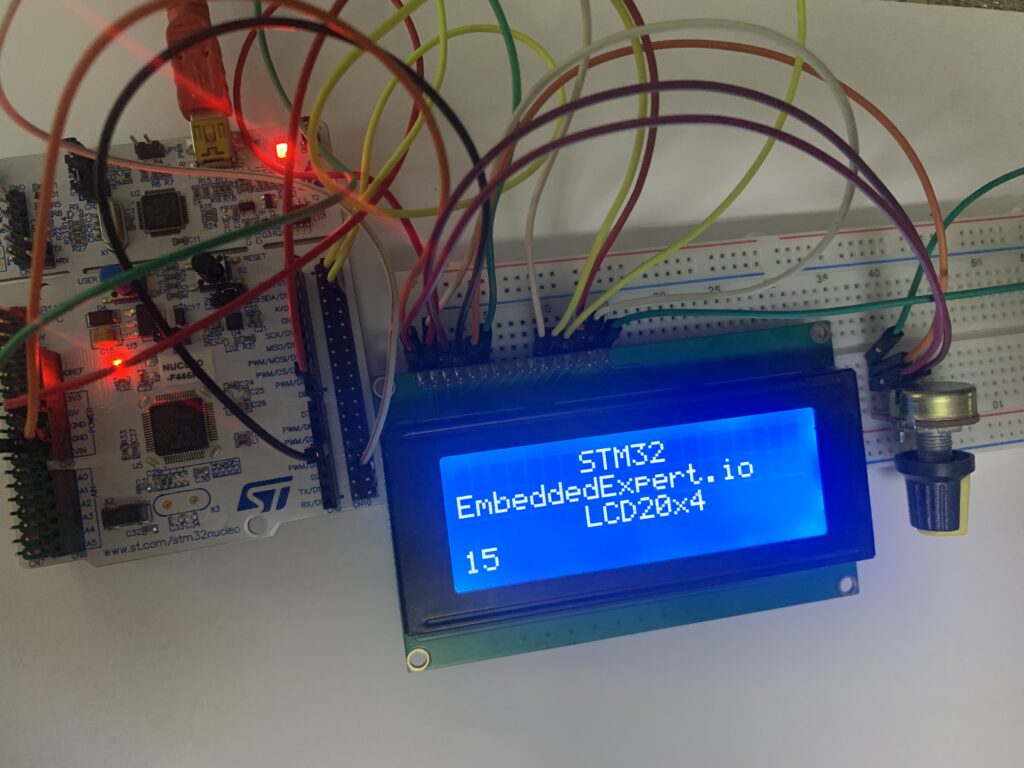
In this guide, we shall see how to use alphanumeric display.
In this guide, we shall cover the following:
- Liquid Crystal display
- Initializing sequence
- Parts and connection
- Code
- Demo
1. Liquid Crystal Display
Character display LCD ares used in so many products we used daily. We can find them in Espresso machines, 3D printers, microwaves and printers and many other products. In this lesson we going to lean how to interface LCD’s to our cortex- microcontroller board. This lessons covers just character display LCD’s there is another lesson covering graphics display LCDs. Th most popular LCD controller currently on the market is the Hitachi HD44780, some other well-known ones include the Tinssharp/Eon 1602A. The content of this lesson applies to all LCD controllers. Where there is a little difference, it shall be indicated.
LCD Pinout
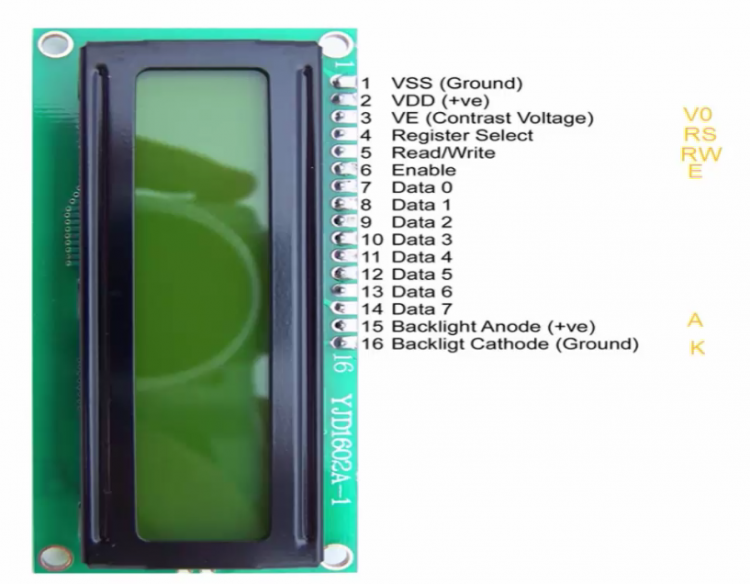
Things to know
- LCD has two internal registers; instruction register and data register
- RS pin is used for selecting these register-
-RS = 0 : instruction command code select
-RS = 1 : data command code select
-RS =0 allows us to send commands such as clear screen, move cursor etc.
-RS= 1 allows us to send data to be displayed or retrieve displayed data .
- R/W : Allows reading and writing information to LCD
-R/W = 1 : reading
-R/W = 0 : writing
- E : E is known as the enable pin. It us used by the LCD to secure information.
– When data is supplied to the data pins a High-Low pulse must be applied
to the E pin in order to secure the data. Minimum width of pulse should be
230ns for the Hitachi and 140ns for the Tinsharp.
- D0-D7 : These are known as the 8-bits data pins. They are used to transfer information to and from the LCDs
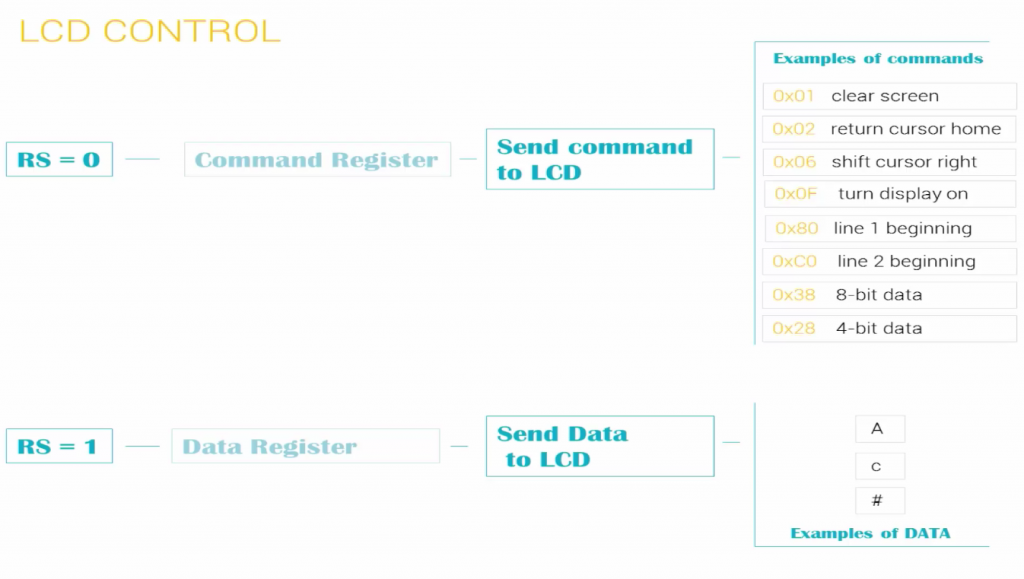
2. Initializing Sequence:
In order to Initialize the LCD, the following is steps is required
- Send 0x01 command
- Wait for 1millisecond
- Send 0x02 command
- Wait for 1 millisecond
- Send 0x28 command
- Wait for 4 milliseconds
- Send 0x06 command
- wait for 1 millisecond
- Send 0x0c command
- wait for 1 millisecond
- Send 0x80 command
- wait for 4 milliseconds
it takes about 100 milliseconds to initialize the lcd
In order to send either data or command, we need to send those data as set of 2 4-bit command using nibble method.
3. Required parts and connection:
In this guide, we need the following:
- STM32F446RE Nucleo-64
- Liquid Crystal display 20 character by 4 lines
- 1KOhm potentiometer
- Hook-up wires
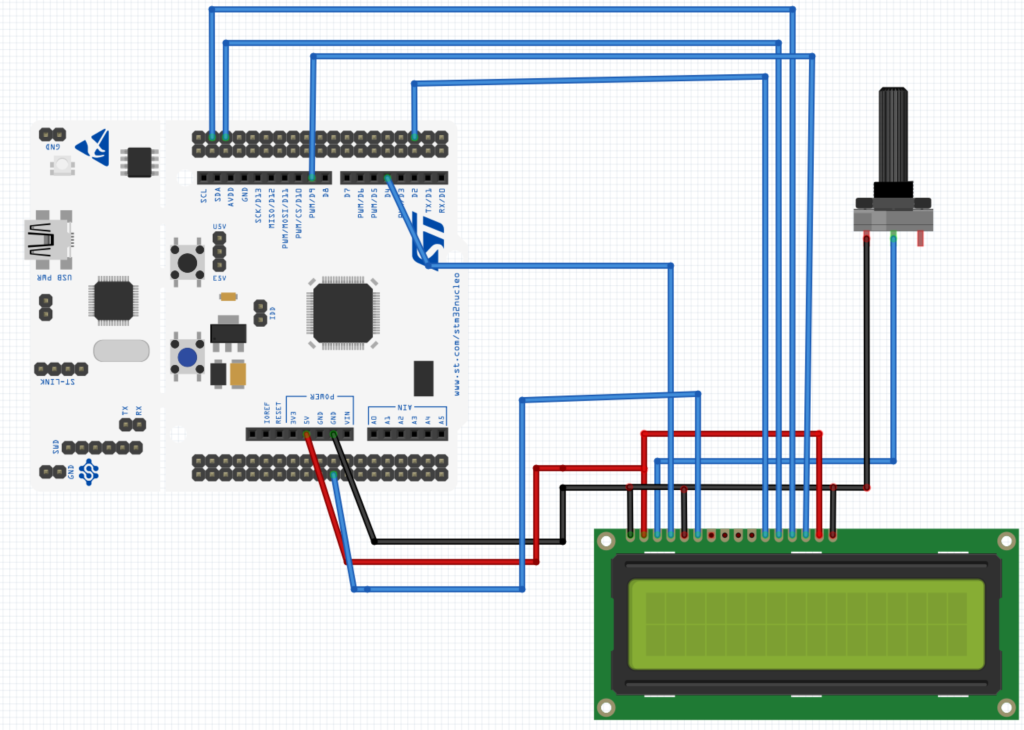
The connection shall be as the following:
- RS pin to PB5
- R/W pin to GND
- EN pin to PB7
- D4 to D7 from PC4 to PC7
Figure below shows the connection for the LCD using STM32F446RE Nucleo-64
4. Code:
//interface hitachi lcd with stm32 using bare metal
//PC4 through PC7 for 4-bit data line

//PB5 as RS pin
//PB7 as enable pin
//-----------------------
#define RS 0x20
#define RW 0x40
#define EN 0x80

// commands
#define LCD_CLEARDISPLAY 0x01
#define LCD_RETURNHOME 0x02
#define LCD_ENTRYMODESET 0x04
#define LCD_DISPLAYCONTROL 0x08
#define LCD_CURSORSHIFT 0x10
#define LCD_FUNCTIONSET 0x20
#define LCD_SETCGRAMADDR 0x40
#define LCD_SETDDRAMADDR 0x80

// flags for display entry mode
#define LCD_ENTRYRIGHT 0x00
#define LCD_ENTRYLEFT 0x02
#define LCD_ENTRYSHIFTINCREMENT 0x01
#define LCD_ENTRYSHIFTDECREMENT 0x00

// flags for display on/off control
#define LCD_DISPLAYON 0x04
#define LCD_DISPLAYOFF 0x00
#define LCD_CURSORON 0x02
#define LCD_CURSOROFF 0x00
#define LCD_BLINKON 0x01
#define LCD_BLINKOFF 0x00

// flags for display/cursor shift
#define LCD_DISPLAYMOVE 0x08
#define LCD_CURSORMOVE 0x00
#define LCD_MOVERIGHT 0x04
#define LCD_MOVELEFT 0x00

// flags for function set
#define LCD_8BITMODE 0x10
#define LCD_4BITMODE 0x00
#define LCD_2LINE 0x08
#define LCD_1LINE 0x00
#define LCD_5x10DOTS 0x04
#define LCD_5x8DOTS 0x00
//-------------
#include "stm32f4xx.h"                  // Device header
#include "stdio.h"
//#include "String"
void delay(int delayms);
void LCD_init(void);
void GPIO_init(void);
void display(void);
void lcd_com(unsigned char c);
void lcd_data(char c);
void setCursor(int a, int b);
void setRowOffsets(int row0, int row1, int row2, int row3);
void LCD_Disp( char *p);
void lcd_nibble_write(char data, unsigned char control);
//--------
unsigned int _displayfunction;
unsigned int _displaycontrol;
unsigned int _displaymode;
unsigned int _initialized;
unsigned int _numlines;
unsigned int _row_offsets[4];
unsigned long seconds=0;
char str[10000];
void delay(int ms);
void LCD_init(void);

int main(void)
{

delay(500);
GPIO_init();
LCD_init();
delay(100);

setCursor(7,0);LCD_Disp("STM32");
setCursor(0,1);LCD_Disp("EmbeddedExpert.io");
setCursor(7,2);LCD_Disp("LCD20x4");

	while(1)
{
sprintf(str,"%lu",seconds);
seconds++;
setCursor(0,3);LCD_Disp(str);
delay(1000);
}
}

//initialize the lcd
void LCD_init(void)
{

lcd_com(0x01);
delay(1);
lcd_com(0x02);
delay(1);
lcd_com(0x28);
delay(4);
lcd_com(0x06);
delay(1);
lcd_com(4);
delay(1);
lcd_com(0x80);
delay(4);
}
//initialize the gpio pins for the lcd
void GPIO_init(void){
RCC->AHB1ENR=RCC_AHB1ENR_GPIOBEN|RCC_AHB1ENR_GPIOCEN;
GPIOB->MODER|=GPIO_MODER_MODER5_0|GPIO_MODER_MODER7_0;
GPIOB->BSRR=(RS<<16)|(EN<<16);;
GPIOC->MODER|=GPIO_MODER_MODER4_0|GPIO_MODER_MODER5_0|GPIO_MODER_MODER6_0|GPIO_MODER_MODER7_0;
}
void lcd_nibble_write(char data, unsigned char control)
{
GPIOC->BSRR|=0x00F00000; //clear data pins
GPIOC->BSRR=data&0xF0;
if(control &RS)
{
GPIOB->BSRR=RS;
}
else{GPIOB->BSRR=RS<<16;}

GPIOB->BSRR=EN;
delay(0);
GPIOB->BSRR=(EN<<16);
delay(0);
}

void delay(int ms)
{
	SysTick->LOAD=16000-1;
	SysTick->VAL=0;
	SysTick->CTRL=0x5;
		for (int i=0;i<ms;i++)
		{
			while(!(SysTick->CTRL &0x10000)){}
		}
	SysTick->CTRL=0;
}
//lcd commands
void lcd_com(unsigned char c)
	{
lcd_nibble_write(c&0xF0,0); //upper data
lcd_nibble_write(c<<4,0); //lower data
if(c<4){delay(2);}
else{delay(1);}
}
// send command to the lcd
void lcd_data(char c)
	{
lcd_nibble_write(c&0xF0,RS);
lcd_nibble_write(c<<4,RS);
delay(1);
}

void setCursor(int a, int b)
{
	int i=0;
	switch(b){
	case 0:lcd_com(0x80);break;
	case 1:lcd_com(0xC0);break;
	case 2:lcd_com(0x94);break;
	case 3:lcd_com(0xd4);break;}
	for(i=0;i<a;i++)
	lcd_com(0x14);
}
void LCD_Disp( char *p)
{
	while(*p!='\0')
	{
		lcd_data(*p);
		p++; delay(1);
	}
}
Add Comment