In the pervious guid (here), we took a look how to write/read single byte using I2C and the slave device is DS3231
In this guide, we shall see how to read multiple byte of DS3231 which they are seconds, minutes and hours and display them on the serial monitor.
In this guide, we shall cover the following:
- I2C read multiple byte.
- I2C read multiple byte code.
- Code.
- Results.
1. I2C Read Multiple Bytes:
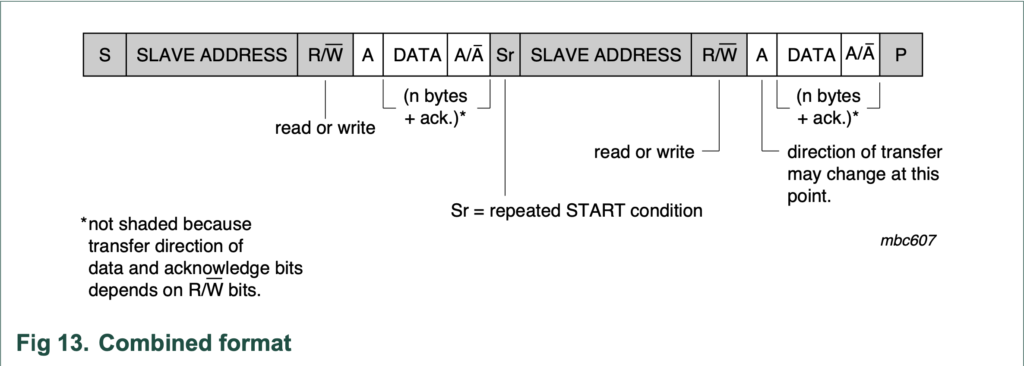
In order to read multiple byte, first we send the start condition, then followed by the slave address with write bit then the memory location in our case ( seconds memory location 0x00). After that a repeat start must be generated and send slave address with read bit after that we enable acknowledge(ACK). We keep reading (in out case 3) until one byte remains then we disable acknowledge (NAK). The figure below shows the reading sequence.
2. I2C read multiple byte code:
In i2c source file, declare the following function:
void i2c1_readMemoryMulti(uint8_t saddr,uint8_t maddr, uint8_t *data, uint8_t length)
The function i2c1_readMemoryMulti takes 4 arguments as following:
- Slave address.
- Memory address.
- Pointer to data buffer to hold the read bytes.
- Length of bytes to be received.
Within the function, we start off by waiting until the bus is free by ready busy bit from SR1 register:
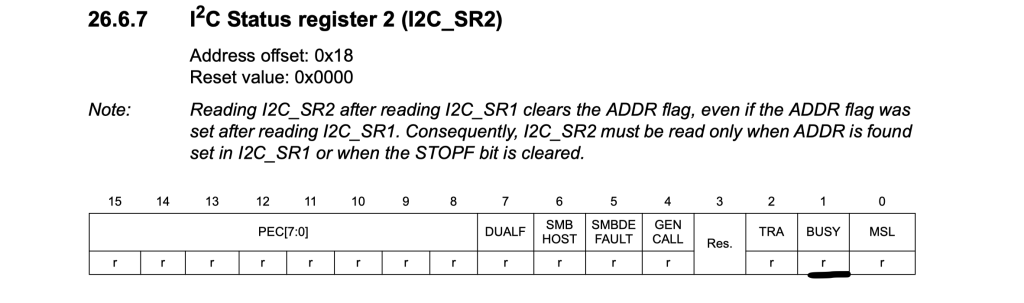
while (I2C1->SR2 & I2C_SR2_BUSY){;}After the bus is freed, send the start condition by setting bit start in CR1 to 1 as following:
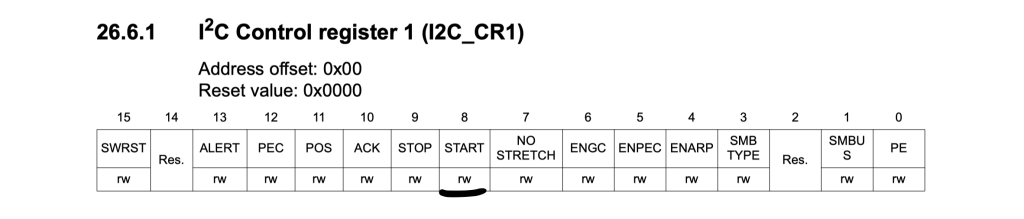
I2C1->CR1|=I2C_CR1_START;
Wait until the start condition is generated:
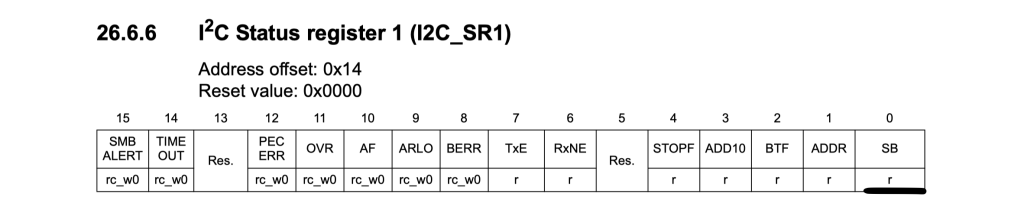
while(!(I2C1->SR1 & I2C_SR1_SB)){;}Then send the slave address shifted to left by 1 bit:
The reason behind the shifting is the address takes the bit1 to bit7 from the data register and bit0 is used for read/write operation. When bit0 is 0, it the operation is write operation and when it is 1, it means read operation.
Here we want to send the memory address to be read:
I2C1->DR=saddr<<1;
Wait until the address is matched by checking ADDR bit in SR1 register:
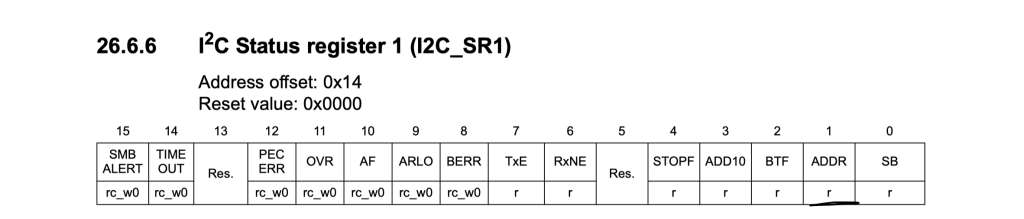
while(!(I2C1->SR1 & I2C_SR1_ADDR)){;}Clear SR2 register:
(void)I2C1->SR2;
Wait until transmit buffer is empty by checking TXE bit in SR1 register:

while(!(I2C1->SR1&I2C_SR1_TXE)){;}Send the memory address:
I2C1->DR = maddr;
Wait until transmit buffer is empty:
while(!(I2C1->SR1&I2C_SR1_TXE)){;}In order to change the direction from write to read, we need to send restart condition followed by sending the slave address in read mode.
To generate the restart condition, generate another start condition as following:
I2C1->CR1|=I2C_CR1_START;
Wait until the start condition is generated:
while(!(I2C1->SR1 & I2C_SR1_SB)){;}Send the salve address with read operation:
I2C1->DR=saddr<<1|1;
Wait until the address is matched:
while(!(I2C1->SR1 & I2C_SR1_ADDR)){;}Clear SR2 register:
(void)I2C1->SR2;
Enable acknowledgment in CR1 register:

I2C1->CR1|=I2C_CR1_ACK;
Now we have a little bit of machine state
In case we have only one byte left, we must do the following:
- Disable acknowledge
- Generate stop
- Wait until receive bit is set
- Store the last received byte to the buffer
- Break the while loop
In case more than one byte left
- Wait for receive bit to be set
- store the data in the buffer
- increment the buffer counter
- decrement the counter
	while(length>0U)
	{
		if(length==1U)
		{
			I2C1->CR1&=~I2C_CR1_ACK;
			I2C1->CR1|=I2C_CR1_STOP;
			while(!(I2C1->SR1&I2C_SR1_RXNE)){;}
			*data++=I2C1->DR;
			break;
		}
		else
		{
			while(!(I2C1->SR1&I2C_SR1_RXNE)){;}
			(*data++)=I2C1->DR;
			length--;

		}


	}
Hence, the entire function as following:
void i2c1_readMemoryMulti(uint8_t saddr,uint8_t maddr, uint8_t *data, uint8_t length)
{
	while (I2C1->SR2 & I2C_SR2_BUSY){;}
	I2C1->CR1|=I2C_CR1_START;
	while(!(I2C1->SR1 & I2C_SR1_SB)){;}
	I2C1->DR=saddr<<1;
	while(!(I2C1->SR1 & I2C_SR1_ADDR)){;}
	(void)I2C1->SR2;
	while(!(I2C1->SR1&I2C_SR1_TXE)){;}
	I2C1->DR = maddr;
	while(!(I2C1->SR1&I2C_SR1_TXE)){;}
	I2C1->CR1|=I2C_CR1_START;
	while(!(I2C1->SR1 & I2C_SR1_SB)){;}
	I2C1->DR=saddr<<1|1;
	while(!(I2C1->SR1 & I2C_SR1_ADDR)){;}
	(void)I2C1->SR2;
	I2C1->CR1|=I2C_CR1_ACK;
	while(length>0U)
	{
		if(length==1U)
		{
			I2C1->CR1&=~I2C_CR1_ACK;
			I2C1->CR1|=I2C_CR1_STOP;
			while(!(I2C1->SR1&I2C_SR1_RXNE)){;}
			*data++=I2C1->DR;
			break;
		}
		else
		{
			while(!(I2C1->SR1&I2C_SR1_RXNE)){;}
			(*data++)=I2C1->DR;
			length--;

		}


	}

}
Also, update the header file to contain the new function as following:
void i2c1_readMemoryMulti(uint8_t saddr,uint8_t maddr, uint8_t *data, uint8_t length);
In main.c file, we shall do the following:
#include "stm32f1xx.h"
#include "i2c.h"
#include "uart.h"
#include "stdio.h"
uint8_t rtc_data[3];
int bcd_to_decimal(unsigned char x) {
return x - 6 * (x >> 4);
}
int main(void)
{
uart2_init();
i2c_init();
i2c1_scan_bus();
while(1)
{
i2c1_readMemoryMulti(0x68,0x00,&rtc_data,3);
for (uint8_t i=0;i<3;i++)
{
rtc_data[i]=bcd_to_decimal(rtc_data[i]);
}
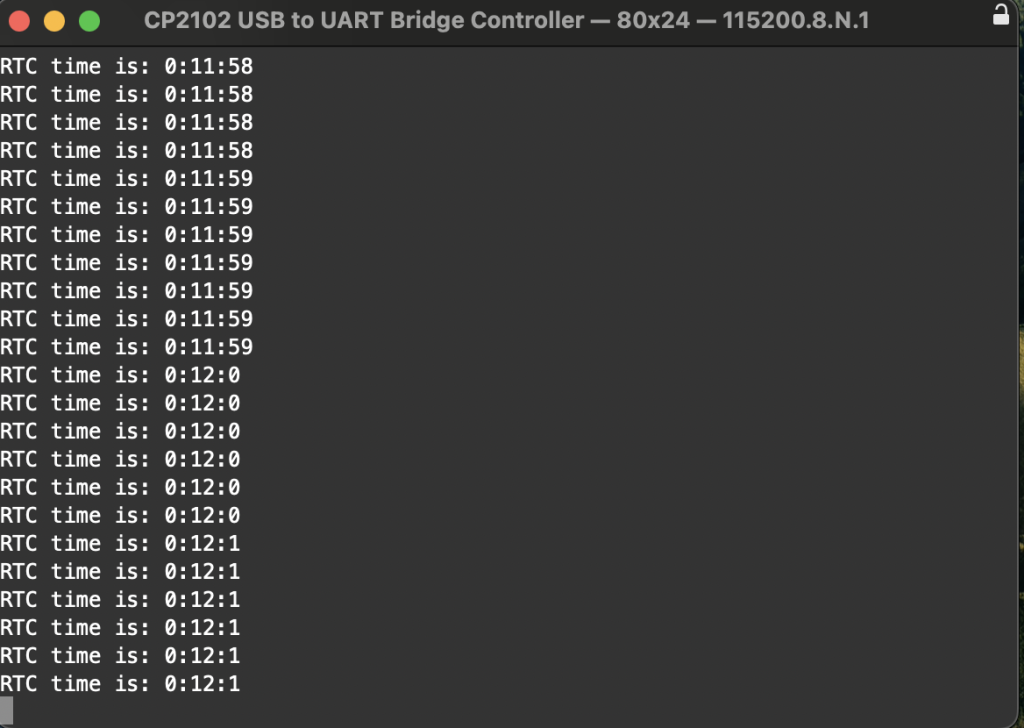
printf("RTC time is: %d:%d:%d\r\n", rtc_data[2],rtc_data[1],rtc_data[0]);
for (int i=0;i<100000;i++);
}
}
3.Code:
You may download the source code from here:
4. Results:
After compiling and uploading the code to your STM32F103C8, open your favourite terminal program and set the buadrate to 115200 and don’t forget to connect FTDI TTL-USB converter and you should see the following:
Happy coding 🙂
Add Comment